Articles Tagged with: BarCamp

Multiple Exposure at BarCampCHS 6

Barcamp-2014

I’ve led a photographically themed session at the annual BarCamp “unconference” in Charleston since 2010, with sessions on post-processing, lighting, retouching, and iPhonography. This year I tried to tap into the technical aspects of creative photography that have existed since the film days – Multiple exposures. We explored two different techniques, one involving a long exposure with multiple speedlights, and the other using the in-camera multiple exposure feature.

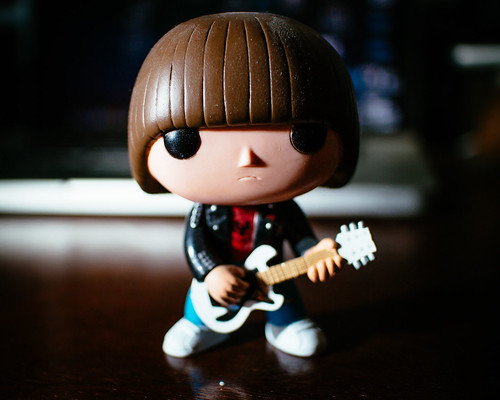
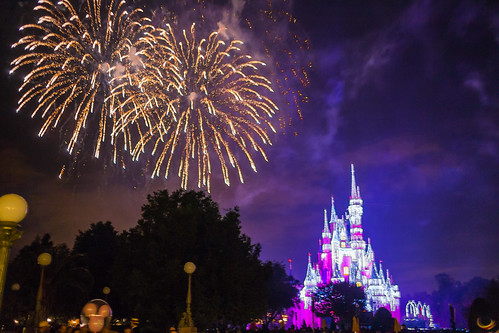
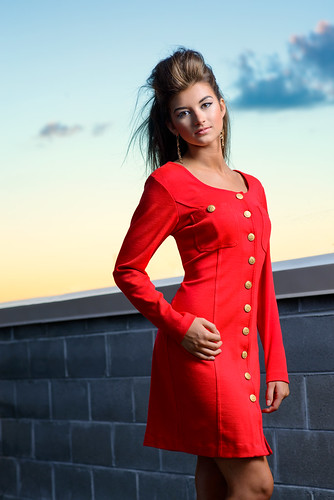
The first demonstration involved off-camera lighting. I used two speedlights and radio triggers to get this effect. I use Cactus v5 radio triggers, which allow me to assign a separate channel to each flash as well as fire them both at the same time. I set the flash on camera left to channel 3 and the one on camera right to channel 2. I set the camera to bulb mode, shut off all of the lights, and shot at ISO 100 and f/9 from a tripod. Rachel is the model, and her brother controlled the radio channels. As I held the shutter open, I had her do each pose and had her brother switch to the appropriate channel and fire the flash. This was the result:

Rachel - BarCampCHS

That’s not a Photoshopped image. It’s all one exposure as far as the shutter actuations are concerned. The multiple exposures come from the separate speedlight actuations. Pretty cool, huh?

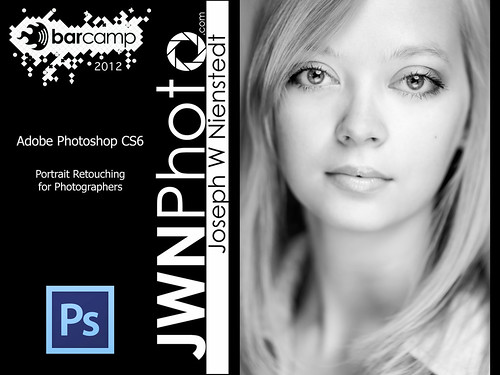
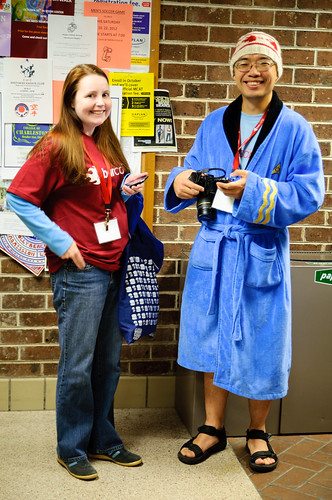
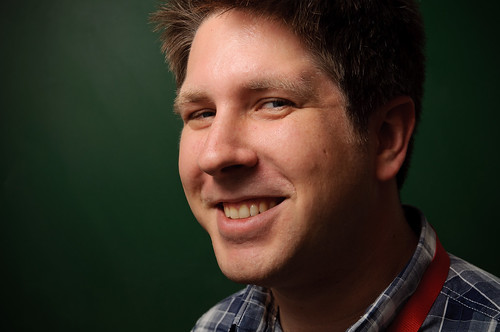
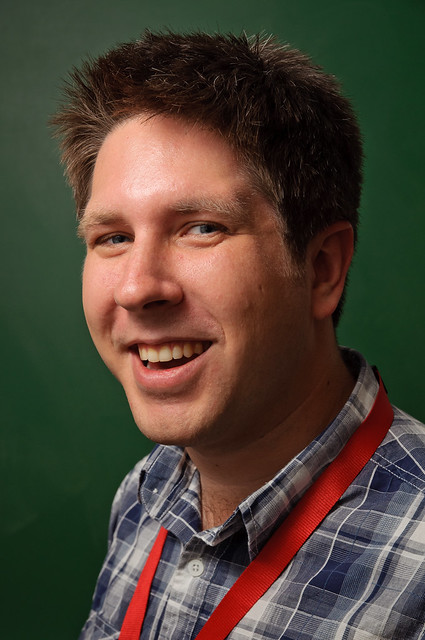
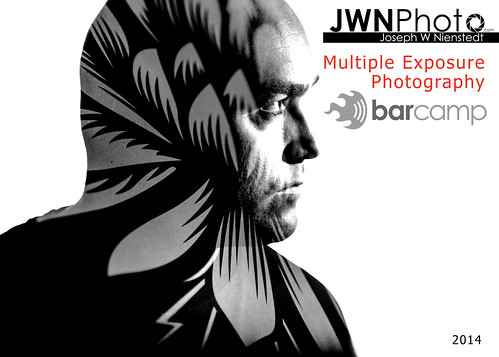
The next technique is a function of most DSLRs – a feature called “Multiple Exposure”. I learned something new about this feature on my Nikon – It’s not available when you’re shooting tethered! Oh well, after a long minute of trying to figure out why I couldn’t get it to work, I unplugged my camera from the presentation computer and got started. The way I set my camera up this time was to set the Multiple Exposure setting to 2 images in a series and then disable the auto-gain. For the effect of constraining the 2nd exposure within the 1st exposure’s silhouette, I wanted the background to be blown out (which is why you want to disable the auto-gain). This technique doesn’t require any special lighting, but since we were in a classroom, I used my speedlights to blow out a white wall behind my subjects.

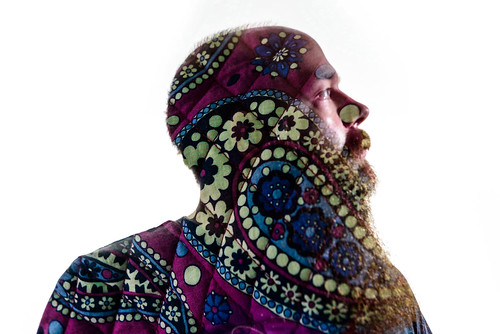
This is John, who certainly had the best beard in the whole conference (probably in all of the Charleston peninsula for that matter). Another attendee had this vibrant purple paisley laptop bag with her that I used for the second exposure. Together they made quite the juxtaposition:

John - BarCampCHS

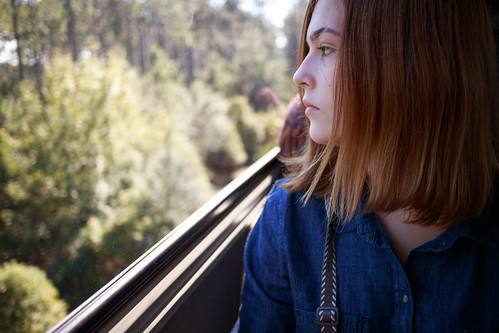
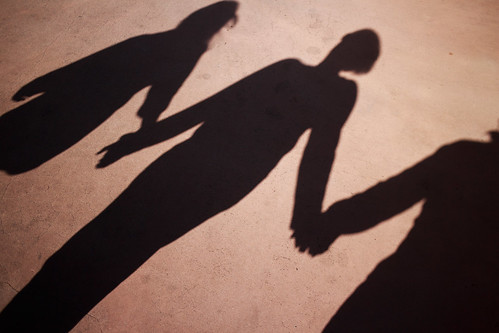
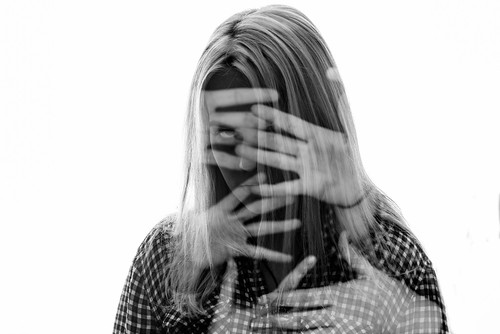
We had time for one more example, so using the same technique, I had this idea that came from something I saw that day at the College of Charleston campus. All over the walkways there were messages about speaking out about rape. There were hashtag messages such as #nomeansno and #itsnotyourfault written in chalk everywhere.

I asked my daughter Mackenzie to pose with a very sad and angry expression, and then I got a few people to stick their hands out for the second exposure. The idea of the shot was to see where you can take the technique creatively. In trying to make a visual interpretation of these messages we all saw that day, this was the result. I didn’t let on that that was what I was going for while we were setting this up because we were having fun during the session, so I hope that anyone who was there didn’t misinterpret my light-hearted presentation as making light of the seriousness of sexual assault in all of its forms.

Mackenzie - BarCampCHS

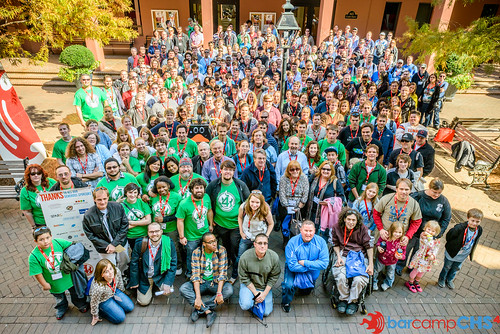
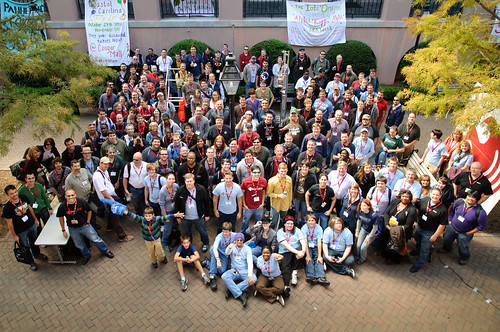
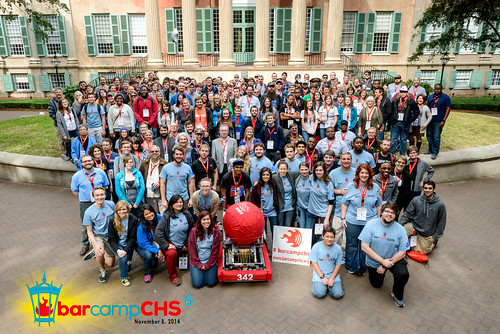
Finally, I once again had the pleasure of shooting the group photo for the conference. Here’s most of the attendees and volunteers who make BarCampCHS happen every year:

BarCampCHS 2014 Group Photo

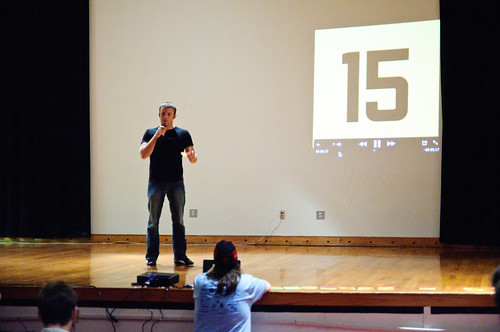
And here’s a photo of me taking that photo, courtesy of Andy Paras form the Post & Courier:

Joeonladder


Sleeping With The Enemy

Collage1

I’m not one to get into the whole brand war when it comes to “stuff”. I really do make educated guesses about the equipment I use for the specific jobs they perform. That said, every DSLR I’ve owned has been a Nikon. The reason has nothing to do with the quality of the system or anything like that. They just feel best in my hand. It’s the one “stuff” decision that has nothing to do with specs or functionality. It’s based purely on ergonomics and the way I use the camera.

Disney World Thanksgiving 2013

I have been on the hunt for a “Family Camera” that suits my nerdier photography needs. I love my Nikon P7000, but when it comes to low-light conditions, its small sensor leaves a gaping whole in its functionality. The newer Nikon 1 system uses pretty much the same sensor. I’ve been lusting over the micro 4/3’s systems, but I’m weary that their small sensors will leave me wanting just a little more than they can deliver also. When Fuji came out with the x100 and put a APS-C sensor into it, I thought “That’s it”, but it’s just too expensive to justify as a family camera. Sony has a fantastic system with the NEX line as well, but unfortunately the interface on those is way too nutty for my liking. Being quite happy with my iPhone, I gave up on paying much attention to what’s been going on in the world of small mirror-less cameras. I didn’t even know that Canon tried and failed miserably with the EOS M earlier this year. Their failure = My gain!

Disney World Thanksgiving 2013

So, why would I buy into a failed camera system? Short Answer: I got one with a lens for well under $300. This camera has the same sensor as the Canon 650D, and it costs a fraction of the price of anything even near it in it’s class. Why is it so cheap? Because reviewers panned the camera into submission. The camera sucks at autofocusing in comparison to other cameras in its class, but Canon recently upgraded the firmware to greatly improve the M’s performance. Now I can even focus on a honey bee’s ass!

Disney World Thanksgiving 2013

I learned about the camera at this year’s BarCamp when fellow photog Phillip Guyton let me play around with his EOS M. As annoying as on-screen controls can be, the touch screen combined with some really smart layout of the controls make for a great compromise for those of us who’ve been using iPhones for many years. I was immediately obsessed. It’s almost everything I want from a walk-around family camera. Sure, the auto-focus issue can sometimes be a challenge, but I was able to hand the camera over to other people and got great results:

Disney World Thanksgiving 2013

Also, it has a hot shoe! Yay for off-camera lighting. One of the first things I did was grab a remote trigger and use on of my Nikon flashes in manual mode to see how it works (It gets a 1/200 sync speed btw). Here’s one of the images I made while I tested it:

Dee Dee Ramone

What other stuff can this camera do that my iPhone can’t? How about slow shutter speeds! I took this shot of a fountain inside the Polynesian resort in Disney World this past weekend:

Disney World Thanksgiving 2013

The M also has much better dynamic range than other compact cameras. While not nearly as good as a full-frame Nikon, this little guy is pretty damn good in a tough lighting situation (that’s not noise in the 2nd shot – it’s foam flying around as simulated snow at the Osborne Family Christmas Lights in Epcot Center):

Disney World Thanksgiving 2013

Disney World Thanksgiving 2013

Disney World Thanksgiving 2013

After spending the holiday weekend with the M, I’m happy to say that for the price of the camera, I definitely have found my “Walk-Around” system (and then some), and would happily recommend it to any photography enthusiast!

Disney World Thanksgiving 2013


BarCampCHS 4

PS-For-Photographers Splash Screen

This past weekend marked the 4th BarCamp in Charleston, SC. What is BarCamp? It can be described simply as an attendee-driven conference. The attendees pitch, vote on, and present the content of the day. It’s a lot of fun and this was my 3rd year doing it.

Once again, I presented a class that was photography related. This time I tackled my portrait workflow in Photoshop. I had two examples prepared to demonstrate the techniques I currently use when editing photos. The first one was a headshot of one of the pediatricians at Sweetgrass Pediatrics. I showed a basic RAW conversion in Camera RAW, and then opened the photo in Photoshop to demonstrate techniques like blemish removal, teeth whitening, how to optimize the eyes, skin softening, and dodging & burning. I finished with my selective sharpening technique. This is the final retouched image:

Dr. King

Due to the nature of BarCamp, my class got scheduled in the very first time slot of the day, which is cool by me (who doesn’t want to get their session over right away so they can enjoy the rest of the day??). Unfortunately, the day started quite late due to the fact that almost twice as many people showed up this year compared to last year. I only made it halfway through my session before we had to move outside to get the group photo made. I promised the class that I would post the second half of my session as a screencast here on my website, so you’re all in for something a little different.

Before I get to that, I wanted to talk about the group photo. As I was packing up my gear in the classroom, my daughter came rushing in and said “Come on, Dad, everyone’s waiting to get the photo taken!” I grabbed my camera and ran to the balcony to see everyone all grouped together on the ground level. I looked down at the crowd and thought “Oh, crap”. Mid-day, cloudless skies. Sharp shadows from the building, and worse, the trees. Bright yellow warm light dappling big swatches of faces, and cool blue shadowy light on the rest. All inconsistent, and no time to get hundreds of attendees to relocate! Besides, where could I possibly relocate them to anyway? Well, I switched my camera’s bracketing feature on and organized the crowd to fit in the frame and fired away.

BarCampCHS4 Group Photo

This photo is the end result of a lot of finessing in Lightroom, Photoshop, and Color Effex Pro. I’ll save you from all of the gory details, but the dynamic range of my camera truly helped me save this photograph. I was able to use a highly underexposed photo (that still had blown highlights anyway) and create a useable image. HDR didn’t fly because there were too many moving parts. Doesn’t matter – people seem to like the shot regardless of the pixel gymnastics it took to get everyone somewhat evenly exposed.

OK, so here’s the screencast I warned told you about – Hope you enjoy it:

And here’s the final image that I retouched in this video:

KarsonTerrell


BarCampCHS Session Wrap-Up

BarCampCHS Group Photo
Group Photo of the BarCampCHS attendees

Yesterday was the 3rd annual BarCampCHS event, and like last year it was held over at the College of Charleston campus in downtown Charleston, SC. As mentioned in an earlier post, I held a session on Off-Camera Flash. Before I talk about the highlights of my presentation, I wanted to share a bit of the BarCamp experience.

BarCampCHS
30 Seconds To Pitch

After you register and get your bag o’ swag, the attendees gather in an auditorium and the people who plan on holding sessions get 30 seconds each to pitch their idea. As you tell everyone what you plan to do, a counter is counting down behind you (a few people did have to get the mic taken away from them mid-thought). In reality, you only got about 25 seconds to pitch since people started counting down the final 5 seconds. I found it quite entertaining, especially when some mouthy participant trying to hawk a couponing network-marketing scheme went over his 30 seconds and tried to continue without the mic. He was followed by @CaananTully who pitched a session on saving money at the supermarket without using coupons. The crowd applauded loudly. Afterward, the attendees lined up to vote on which sessions they’d like to attend.

With that, sessions began about a myriad of topics, although it was highly concentrated on computer programming. Some of the more popular sessions focused on geek culture, including a session about modifying old Nintendo Entertainment System games such as Super Mario Brothers.

BarCampCHS
Eugene Mah Flaunts His Bathrobe Style

Eugene Mah took a lot of great photos of the days events, and they can be seen here. There is a BarCampCHS Flickr Group to check out, as well as my full set of photos. Twitterer @Pataford has a Ustream channel with some video he took. If you have some content I missed, please let me know in the comments! Now, on to my creative session:

Off-Camera Flash 101 Session


Slides from my BarCampCHS presentation

I started off the presentation by a short introduction and recap of my session from last year on photo editing. I showed some of the photos we made and edited and started talking about the creative use of lighting in the shots. This led to a brief discussion on why you would want to use off-camera flash. I also touched a little on why you would ever use your on-camera flash, and showed an example of fill flash outdoors during a bright and sunny day.

Next, we talked about shooting in manual mode – both on the camera and on the flash. We talked about the benefits of TTL as well as its shortcomings and why it’s important to know how to use manual flash, especially when working with light modifiers. I explained how when dealing with off-camera flash, you can control your ambient light with your shutter speed and your flash power with your aperture settings. Someone asked about ISO settings, and I explained that you want to shoot in your camera’s native ISO when dealing with lighting to produce consistent and clean images.

The next part of the session dealt with the different methods of getting your flash off of your camera. The first method was using bounce flash. I explained that even though the flash is still technically on the camera, the light source is now whatever you are bouncing the flash off of, which is indeed off of the camera. @TheKingOfGames volunteered to be our model as we took some sample shots. We started with a shot with the flash on the camera to reference the difference.


Straight Flash on the Camera

As you can see, the shot is not all that flattering. Someone in the class said “It looks like something you might see on Facebook”. I then showed the differences when bouncing the flash off of the ceiling or wall. In the following shot, I used the projector screen to bounce off of, which was really bright and reflective:


Bounce Flash Off A Wall

You can immediately see the difference in the quality of light. I talked about the softness and direction of the light, which made for a more defined image whereas the straight flash shot was very flat.

Next we talked about using a wire to move the flash off of the camera. The benefit being reliability while being able to cheaply transmit TTL information, with the downside being limitations of the cable’s length. We briefly talked about the different standards in cables, including PC Cables, 1/8″ Audio-Style Cables, and TTL Cables. I had a TTL cable that I use with my bracket, so we took a test shot using the bare flash:


Bare Flash Using a TTL Wire

Since I only had a short cable, I was able to demonstrate the limitation of the distance I could place the flash away from the camera (about arm’s length).

We then talked about wireless flash. I covered the three main methods of shooting wireless: Optical, Infrared, & Radio. We discussed the benefits and issues with each method. Optical is cheap but unreliable. Infrared can transmit TTL information, can be cheap depending on the hardware you already own (it also can be quite expensive if your camera doesn’t support it), and how you can control the flash settings from the camera. It’s also limited to line of sight and is very unreliable outdoors. I took a test shot using the pop-up flash on my D90 in commander mode to fire an SB-600 on a mini tripod to camera right:


IR Wireless Flash Test Shot Using an OmniBounce Diffuser

I spent the most time on radio triggers. I talked about the Pocket Wizards and Chinese knock-offs. I explained that you can buy about six Cactus v5 triggers for the price of one Pocket Wizard Plus II and according to many reviews and tests, the Cactus v5 is more reliable! I also touched on the newer Pocket Wizards and Radio Poppers that are able to transmit TTL information. I explained that for the cost of that convenience, you could be investing in some great lights! Sure it would be nice to justify having the top of the line triggers, but there’s no shame in buying a set of reliable knock-offs when you can achieve the same end-result for a fraction of the cost.


Photo by Daniel Vice @sharpstick on Twitter

I started doing some shots using an umbrella. I demonstrated how to control the flash power by changing the aperture, and then mixing ambient light with flash by adjusting the shutter speed. I showed how to match the ambient florescent lighting and flash lighting by gelling the flash with a green gel and setting the white balance in the camera to florescent.


Umbrella Look

I also talked about sync speed. I demonstrated what happens when you shoot faster than your sync speed:


Shooting Faster Than Your Sync Speed

I then changed the umbrella and set it up as a shoot-through umbrella and showed how it created a different look.


Photo by Daniel Vice @sharpstick on Twitter

I took a few shots as I moved the light around to get a softer look.

BarCampCHS Lighting Session
Shoot-Through Umbrella Look

I also altered the model’s position a bit and added another flash onto my camera at its lowest power setting to try and achieve a small catchlight in his eyes. This was our final result, which will hopefully make for a nicer Facebook profile pic than what we started with 😉

BarCampCHS Lighting Session
Final Shot

We did some Q&A, and I shared some resources for learning about camera lighting. Here’s my list:

joemcnally.com – Joe McNally
strobist.com – David Hobby
zackarias.com – Zack Arias
kelbytraining.com -Scott Kelby

I also wanted to add a pair of new eBooks by Piet Van den Eynde on Craft & Vision. You can pick up each of the two eBooks for $5 each, or buy them both at the same time for only $8. He’s done an excellent and thorough job in the first book of introducing the reader to off-camera flash, and takes you much further in the second one. I think it’s definitely worth more than $8!

Tech Specs For My Presentation

Gear:
Camera: Nikon D90
Lens: Tamron 17-50 f/2.8 VC
Flash: Nikon SB-600
Light Stand: Manfrotto 5001B
Umbrella: Photek Softliter II
Wireless Triggers: Cactus v5
Gels: Cokin Photogels
Mini Tripod: Jobi GorillaPod

I ran the presentation on an iPad hooked up through a projector using Keynote for the slides and Photosnitch for the live demo. I used an EyeFi wireless SD card to transmit the photos to the iPad sans cables.


The Fall Is Awesome!

Day 251 - Sullivan's Island Lighthouse Sunset

This is the best time of year to capture sunsets here in the Charleston area. The weather is beautiful and the sky seems to catch on fire for a brief moment. There’s also no shortage of fun stuff coming up, such as corn mazes, haunted house attractions, hayrides, and pumpkin picking. Halloween just might be my favorite holiday ever – it brings people together. What other holiday makes you go out and ring on your neighbor’s doorbell so they can give you treats?

Kegan Digs Out a Pumpkin

I have a busy month ahead of me as well. One of the highlights include a wedding shoot this weekend on Folly Beach. I’m pretty stoked about getting some sunset portraits of the happy couple. October 22nd is BarCamp! If you remember, I did a session last year on photo editing (you can check out the post about that here). This year I’ve proposed a session called “Off-Camera Flash 101

BarCamp Session Portraits Color

If you’ve never been to or heard of BarCamp, it unfortunately has nothing to do with alcohol. It’s a conference where the attendees are the attraction. Basically anybody who attends can pitch a session to teach. It’s really fun and you get a kick-ass T-Shirt. It costs a mere $10 to participate – get a ticket now!

Mira The Fortune Teller

Next up, I’m doing a photo booth for the Summerville Ghost Walk/ Harvest Fest/ Harvest Moon Hayride sponsored by DREAM and Summerville JSL. That’s on Saturday, Oct. 29, 2011 from 6:00PM-9:00PM. I’ll be on the side of the Prudential Southern Coast office at 112 W Doty Ave in Summerville, SC. I hear that Mistress Mira will be doing some fortune telling as well 😉

Coastal Carolina Fair Sunset

October 27th-November 5th is the return of the Coastal Carolina Fair. Check out my recap rom last year. I just ordered my prints for the Photography Contest. This year they have changed the rules slightly from last year as you can only submit 3 photos now. I guess the contest has grown a bit! You can see the official rules here.

Of course, I’ve saved the best for last. Just read my rundown of last year’s CupcakeCamp event. It was the single most amazing event ever conceived. All you can eat free cupcakes, no questions asked. If you don’t want to go to this, you’re not human. CupcakeCamp will be on November 5, 2011 3:00PM-5:00PM at Spirit Moves. Check out the Facebook event page here. Look at the sweetness:

CupcakeCamp Charleston


What’s Going On At BarCamp CHS 2010?

BarCampCHS The name BarCamp is very misleading. At first glance it looks as though it might rival CupcakeCamp – thoughts of free exotic alcoholic drinks for everyone enter my mind, except if that were the case, a completely darker scenario would most likely unfold as inebriated attendees start invading each others personal space with stories of near-misses, high school sports accomplishments, and the good old days when computers ran on 5¼ inch floppy drives, eventually leading to at least 3 fist fights and countless inappropriate advances on the opposite sex. Don’t get me wrong, I would still go if that were the case, but I would most likely leave the family behind. Nope, this BarCamp thing is nothing like that – well except maybe for pining about 5¼ inch floppies.

I couldn’t attend last year’s BarCamp in Charleston, so I don’t have first-hand experience with it. The video above is from last year’s event, and it was made by my buddy Geoff. It should give you a good feel for what to expect. It’s a user-driven conference that covers a broad range of tech-related topics. To pull some quotes directly from their website, “BarCamp Charleston provides local area techies, developers, designers, and entrepreneurs with an open environment for learning and sharing.” and the addendum to that statement, “BarCamp Charleston is typically geared towards technology topics, but considering all of the creative diversity in the Lowcountry, we want to broaden the scope and encourage all digital artists, writers, designers, non-profits, and more to participate.”

Day 216 - Movie for One

The session that I have proposed is “Developing Photos in a Digital Darkroom” and I plan to talk about my theories about post processing and I will share how to develop three different styles of images using Adobe Lightroom. The theories and techniques can be applied using any kind of photo editing software, so there is no need to dismiss this if you use something like Aperture or Elements. I think it will be an exciting session as I see a lot of amazing photogs out there that are reluctant to finish the job they started by developing their digital negatives, usually rationalizing that you should get it right in the camera. Of course you should get it right in the camera, but that doesn’t mean you can’t make it exactly like you saw the image in your mind! We’ll dive into that topic on Saturday.

For $10, you get admission to the conference, which is at the College of Charleston this year, along with breakfast, coffee, soda/water, lunch, a t-shirt, other goodies, and entrance to the after party, which might turn into the scenario I imagined above. How could you not want to do this? You’re getting more than your money’s worth in food and clothing alone!

Lets talk about the diversity of some of the other sessions that are proposed at this time.

For those that like trading stocks, there’s “High Frequency Trading In Today’s Market“, which could go hand-in-hand with “Salsa dancing for noobs” and “Homebrew 201 – Taking your brew to the next level“. See, clearly there are options for your non-techie friends! While they’re learning how to drink, dance, and make more money, you can be “Creating a web presence with Joomla” or designing “HTML Email Newsletters & Double Rainbows” Wait a sec? Did somebody say double rainbow?

Another photography related session is “Photoshop: fun tips and tricks“. I think a popular session will be “The Social Graph – Who knows who?” which might prove to be an interesting networking opportunity. I’m also interested in “Good Vibrations: Take the Anxiety out of Goal Setting“, but mainly because the presenter’s name is Shoshanna Szuch, and I have the urge to yell out, “Au revoir, Shoshanna!” at random times on a daily basis.

I hope you can make it on Saturday, you should buy your tickets soon before they sell out!


Privacy Settings
We use cookies to enhance your experience while using our website. If you are using our Services via a browser you can restrict, block or remove cookies through your web browser settings. We also use content and scripts from third parties that may use tracking technologies. You can selectively provide your consent below to allow such third party embeds. For complete information about the cookies we use, data we collect and how we process them, please check our Privacy Policy
Youtube
Consent to display content from - Youtube
Vimeo
Consent to display content from - Vimeo
Google Maps
Consent to display content from - Google