Category: Inspiration

Help-Portrait MUSC Kids 2011

Maya

Every once in a while you take a photo that reminds you of why you love photography. Help-Portrait is an event where every time you press the shutter you make that picture.

Marquaja

On Friday, our small group of volunteers headed back to the atrium at the MUSC Children’s hospital in downtown Charleston, SC to give portraits to families of children who are being cared for there.

Megan

This year, the organizers of Help-Portrait have reversed their stance on sharing the photos of the subjects and have in fact encouraged us to do so. I’d like to share the photos I took of our 13 subjects during the event.

Morgan

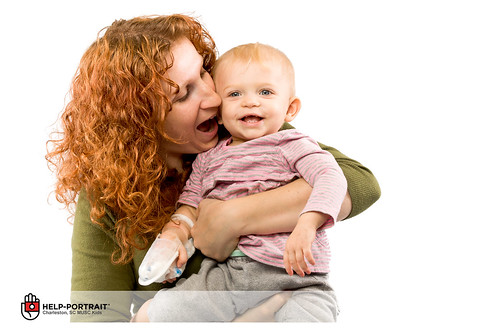
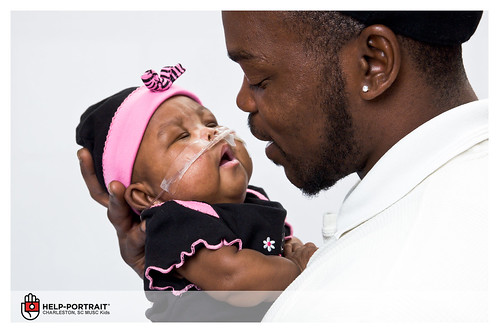
It’s amazing to be able to give the families of these kids something in a situation where so much has been taken from them. There is something about a kid smiling with you despite the struggle they’re fighting that makes you value the life we have.

Riley

Sarah

Chandler

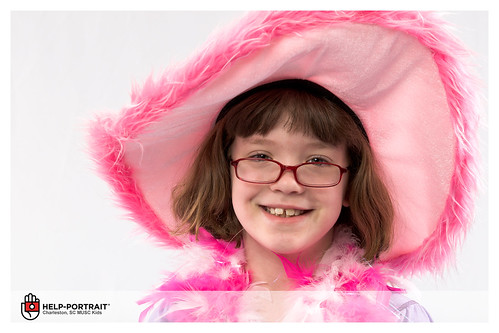
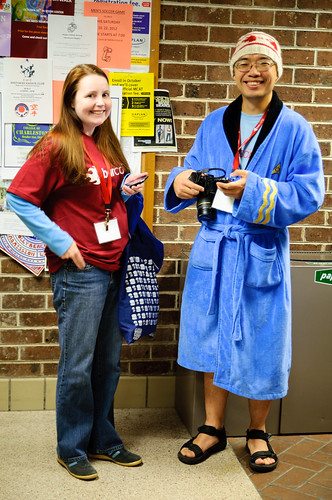
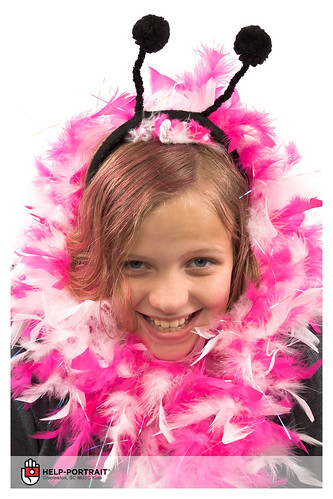
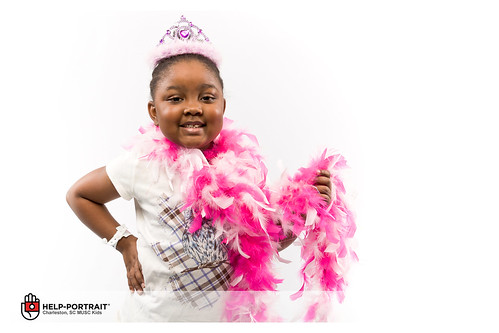
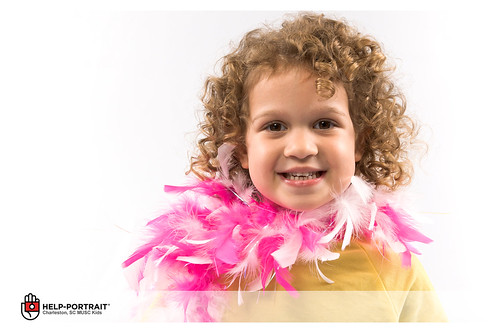
Amy was in charge of gathering hats for our wardrobe since hair & make-up really wouldn’t work in this situation. For all the hats that we brought, the girls mostly liked the feather boa!

Lashonda

Emily

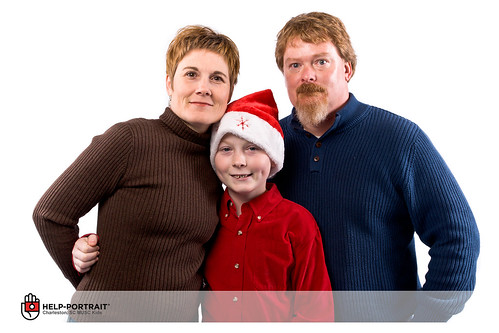
As I’ve mentioned before, the inspiration for us to bring Help-Portrait to MUSC Children’s Hospital came from leukemia survivor Jesse Dasinger. Last year, he was unable to participate due to his health. This year, he’s doing amazingly well and was able to drop in with his family to get his picture made:

Dasinger Family

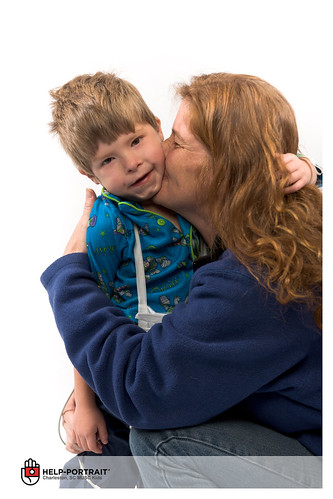
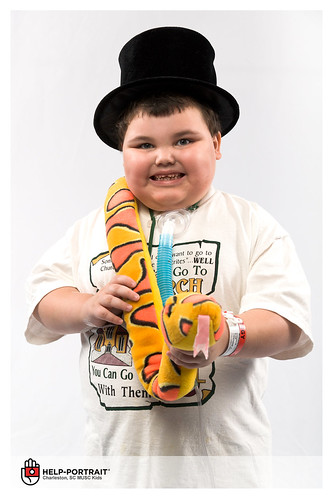
I did have on technical problem that arose from a bad cable, and I had to retake Christopher’s photo here because the first attempt failed. He was a trooper, and was able to re-create the magic:

Christopher

D'Marcus

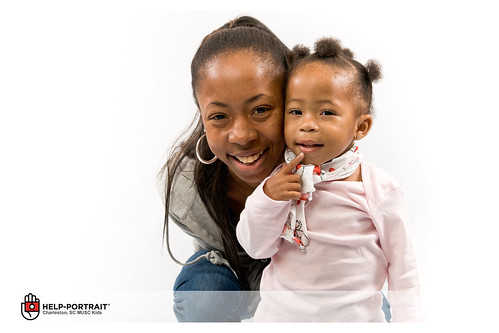
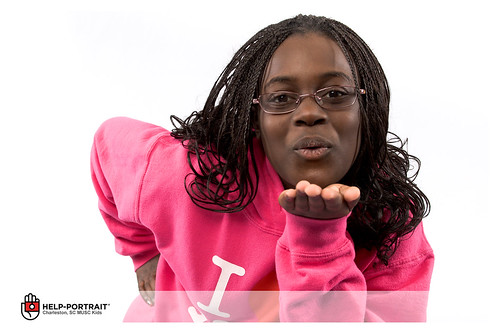
One of the brightest moments for me was when this girl, Amouri, came to get her photo made. She was also the last subject I shot. I grilled her a bit at first and found out she was a cheerleader. I knew she would be a great subject. She said something that made me feel tremendously enlightened about what goes on at MUSC. I asked her how she was feeling, and she said “I feel amazing”.

Amouri

Another change introduced in this year’s Help-Portrait was the involvement of the participants. We came up with the idea to bring plain wooden picture frames to let the kids decorate them with – they loved it! John Lindroth took this shot of Megan:

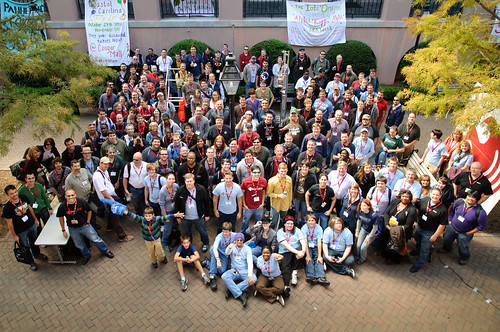
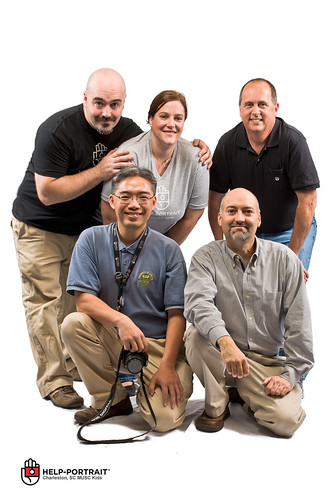
Here’s the team photo shot by one of the staffers at the hospital:

Help-Portrait Charleston SC MUSC Kids Team

Drew, John, & Eugene also have some photos of the event that I’ll share soon. All of the photos will be available here. I also participated in the Charleston Help-Portrait group at the James Island Convoy of Hope event yesterday. I’ll be sure to write up another recap of that event soon! Stay tuned…


Last Week of Movember

Movember Week 3

All right loyal photo enthusiasts, friends, family members, lurkers, and internet bots. I know you’re reading this (I see the analytics reports). It’s time to give back! Help me raise money for men’s health charities through my Movember page. Even if it’s a couple of dollars. Anything you can afford to donate will help.

Movember Week 2

Over the past 3 weeks, I’ve gone through the effort of making self portraits to document my facial hair growth. I do have an ulterior motive though – I’m trying to get your attention with them. Much like the actual mustache on my face starts conversations with the people I see on a regular basis, I’m posting these pics online to spark your interest in helping us men folk out.

Movember Week #1

The time is here and now. Head on over to my MoSpace page and help out if you’re planning on helping. We’ve only got this last week to go, and I’d really like to see just how much of a difference this little website can make.

Thanks for reading,

Joseph W. Nienstedt


Emily & Joe

Emily & Joe

Last month I shot a really cool wedding on Folly Beach in South Carolina. The couple was amazing as they were willing to do just about anything – they truly had fun at their wedding and it shows in their pictures. Lets be honest, how many people have a wedding party photo like this?

Emily & Joe

I did do a lot of more formal portraits such as this (which is probably one of my favorite shots of the day because of that amazing southern sunset):

Emily & Joe Sunset

But I’m sure a shot like this will make them smile pretty wide when they’re old and gray:

Emily & Joe

Joe & Emily really weren’t your traditional couple, which is a perfect fit for me since I’m not a traditional photographer! I did make sure to cover the basics of wedding photography though, such as capturing the elements of an American wedding.

WeddingCollage1

Here’s the bride getting prepared:

WeddingCollage2

And the first look:

Emily & Joe

The respective wedding party portraits:

WeddingCollage7

The ceremony:

WeddingCollage4

And the first kiss:

WeddingCollage5

The signing:

Emily & Joe

And then of course, everybody’s favorite part of the wedding, the reception. Here are some elements of their tables:

WeddingCollage3

The first dance:

WeddingCollage6

I did grab the newlyweds to do some sunset portraits during the reception. Joe didn’t know that he was going to be my movable sandbag for a few shots:

WeddingCollage8

After the sun went down, they partied:

WeddingCollage9

And Joe found the garter and Emily fed him some cake:

WeddingCollage10

I can honestly say that with couples as fun to shoot as this, wedding photography can be a blast. I consider myself lucky to have been their photographer for their special day.

Emily & Joe


Help Portrait MUSC Kids 2011

It’s been almost a year since we held our Help-Portrait MUSC Kids events (last year we did 2 – you can read about those here and here). This year, I’ll be leading our team on Friday, December 9th at the MUSC Children’s Hospital. We can’t do weekends at the hospital, so this was the closest we could get to the actual event. The Charleston, SC Group is also planning to host 4 events simultaneously on the official day in North Charleston, Charleston, James Island, & Johns Island. So if you can’t help us out on Friday, I’m sure they could use it on Saturday.

This year the Help-Portrait organizers want everybody to be a bit more interactive with their subjects. To best understand what they mean, Jeremy Cowart tells us in this video:

I think we can do some exciting stuff with these children since we don’t have a large amount of kids that we shoot. We can really spend some time getting to know their stories and spreading the word about Help-Portrait. Some ideas I have are to do some video, which would mean that a videographer could help us out this year. Since we can’t really do hair and makeup, maybe we could incorporate some really awesome hats as props – if anyone can pull together a unique hat collection, that would be cool (maybe we could ask a local thrift store to lend some to us). How about some frames that the kids can paint? I’ll be bringing a 5×7 photo printer, so the kids can make their photos into an art project (the atrium has painting supplies). If you have any ideas, I’d really appreciate them (either here in the comments, on the Help-Portrait Community site, or on Facebook).

I also wanted to share with you some great news from the boy who was our inspiration to do this at MUSC Children’s Hospital. Jessie Dasinger has passed the 280+ day mark after his bone marrow transplant and he’s doing great. He’s back in school and back to being a normal kid again. His story is an inspiration considering that just a year ago at this time he wasn’t well enough to participate in the event.

Make sure to check our community page for all planning info regarding the event. It’s less than a month away, so please don’t be shy – lets get the conversation started!


New Vs. Old

Kevin Seconds
Kevin Seconds at Jimbo’s Rock Lounge

Last night I attended two musical performances. One was a group of budding pianists performing in their first recital, while the other was a pair of more mature punk rockers playing acoustic sets.

Mac's Piano Recital
Mackenzie Performs At Rollings Middle School of the Arts

I started off the evening at my daughter’s middle school, which is a local magnet school for arts. She auditioned to become accepted into the school as a pianist, and in just a couple of months her skill behind the keys has skyrocketed. She played an flawless rendition of “A Journey In The Arctic” by John Thompson.


Mac’s performance (filmed by my wife on her iPhone)

The kids in her class were amazing. These 11 year olds killed! They have a really good teacher, and Mac is lucky enough to have Mrs. Shelly, who helped prepare her for school and continues to show her support.

Mac and Her Piano Teachers
Mac & Her Piano Teachers

After the recital, I jumped in my car and headed down to West Ashley to see punk rock legend Kevin Seconds from the band 7 Seconds perform at Jimbo’s Rock Lounge. The opening act was a couple of local punks from the band the 33’s who played very youthful punk songs about rebellion and fighting the man.

Jimbo's Rock Lounge

I was definitely no longer at a middle school recital anymore, with more “F*cks” in their first song than in a classic 80’s porn tape.

David Dondero
David Dondero

Next up was David Dondero. I had never heard of David before, and he really floored me. The songs were all extremely well written and memorable. His voice is fantastic, he kind of reminded me of what Bright Eyes would sound like without the whining.

David Dondero
David Dondero

Finally Kevin Seconds took the stage. Last time I saw his band 7 Seconds, I was a teenager in New York. Now, at the age of 50, Kevin tours around the world playing songs from throughout his career.

Kevin Seconds
Kevin Seconds

As requested from the audience, Kevin played the 7 Seconds classic “Soul To Keep”. He preempted it by saying that for as much shit his band caught for the stuff they did in the mid-1980’s, it gets requested every night.


Kevin Seconds filmed on my iPhone

I really think these guys deserved to be playing to a packed house, but Charleston just isn’t a punk rock town. It’s quite unfortunate, because the music is really great. I don’t think they were bothered by the small turnout, in fact they seemed just happy to be out on the road playing.

Kevin Seconds
Kevin Seconds Blowing The Harp

The comic relief came when some dude walked up on stage between songs and requested that Kevin play some Pink Floyd. Kevin laughed and respectfully declined. The staff however, did not appreciate the man’s actions. In fact, the bartender demanded that he leave immediately. He made the mistake of saying, “What are you gonna do about it?” and she jumped over the bar, grabbed him by the back of his neck and physically threw him out. Stupid me stood there mouth agape watching this unfold with a camera in my hand instead of up to my eye! I did manage to get this blurry shot though:

Kick-Ass Bartender Boots Crackhead

Kevin told her that she was hired as his road security if she wanted the job. I asked her if I could take a shot of her for this blog since I blew the action shot 😉

Kick-Ass Bartender
This Bartender Takes Crap From Nobody

Check out all of yesterday’s photos here on Flickr.


Happy Halloween

Trick Or Treat
The big night is finally here!

I wanted to quickly wrap up my favorite holiday of the year with some family pics. As you may have read in my last 2 posts (here & here), we’ve had a very busy Halloween weekend.

Halloween Costumes 2011
Trying on the Costumes

Above is a shot I took when the kids got their costumes. Below are the portraits I made during one of the photo booths I did this weekend.

GhostWalk - Mac Portrait GhostWalk - Amy Portrait GhostWalk - Kegan Portrait
Photo Booth Portraits

We planned on getting our pumpkin carving done on Sunday, but we did not know there was a pumpkin shortage going on! We went to all of the local supermarkets and Walmarts trying to find some pumpkins. We settled on a couple of heirloom pumpkins which were not good for cutting up. I went and got some paint and the kids went to town making their own creations. It turned out to be a creative break from the normal tradition! The kids did awesome.


Pumpkin Painting

We went Trick or Treating with our neighbors. The adults have decided that we need a similar holiday where you knock on everyone’s doors and ask for beverages. Drink or Treating has all the makings of a great tradition – everyone who participates stocks up on their favorite beer and you just walk around town tasting each other’s brew of choice. No need to call a taxi, as you’re on foot & not far from home. I think we could make this work. Who’s with us?


Trick or Treating


Coastal Carolina Fair 2011

Coastal Carolina Fair 2011

Much like last year, the year before that, and for 50 something years before that, the Coastal Carolina Fair has come to Exchange Park in Ladson, SC. Actually, they’re celebrating the 55th year of the fair in the Charleston area this year – that’s over a half-century of fried Kool-Aid (or Oreos, Twinkies, sticks of butter). This year I went with the family, but I still managed to get a bunch of shots of the fun. I also wrote up a similar post last year, so feel free to check that out.

Times Square

This photo of the taxi cab tourist in NYC won an honorable mention in the Division 1 photography contest! Just thought I’d share that with you in case you aren’t able to check out the art exhibits. If you do go there, please notice (and laugh at) my giant self-portrait that is keeping a half-bearded eye on the exhibit hall. Thanks.

Coastal Carolina Fair 2011

We arrived just before sunset, and I have to say that I was disappointed by the sky this evening. The clouds were perfect for a spectacular southern light show, but just after I took this shot, they vanished and we got one of those shapeless sunsets. Oh well, there’s always next year 😉

Coastal Carolina Fair 2011 Coastal Carolina Fair 2011 Coastal Carolina Fair 2011

I did try to compensate for the lack of definition with a graduated pink Cokin filter that I held in front of my lens. I also tried to get creative with this shot:

Coastal Carolina Fair 2011

Something about this guy in front of the balloons caught my attention. I wonder how many times Old Man Jenkins here had his plans foiled at the old amusement park by some meddling kids before he took a road gig?

Coastal Carolina Fair 2011

The big star of the show for me is always the big Ferris Wheel. I just love the patterns of light and the plethora of angles to capture them. This year I decided to go head on.

Coastal Carolina Fair 2011

Coastal Carolina Fair 2011

Coastal Carolina Fair 2011

Kegan found out that he does not like heights on the skylift.

Coastal Carolina Fair 2011

Here he is, holding on like a trooper:

Coastal Carolina Fair 2011

The kids made good use of their “all you can ride” hand stamps.

Coastal Carolina Fair 2011

Coastal Carolina Fair 2011

Coastal Carolina Fair 2011

I’m pretty sure I’ve taken this same shot of these same ducks every year I go to the fair. As fun as the fair is, it really is very consistent. And by consistent I mean it’s the same dang thing every dang year!

Coastal Carolina Fair 2011

In the petting zoo, I thought I would get all artsy with this close-up of a cow’s head:

Coastal Carolina Fair 2011

But then she did this, and I couldn’t resist:

Coastal Carolina Fair 2011

The fair wouldn’t be the fair without some of that newfangled country music I didn’t grow up listening to. From where I stand, the new country folks basically took all of their cues from 80’s hair metal but got rid of the distortion pedals and added a fiddle. But, there was a huge crowd of people there to see Colt Ford, and I snuck up to the stage to grab a couple of shots and see what all the commotion was about. By the way, the security are always really cool at the fair if you ask to take some shots first!

Colt Ford - Coastal Carolina Fair 2011

Good old Colt must be a big deal around here, because even the people not watching the concert were singing along as they walked around the food court in earshot of the show. We started to head to the car when I got taken by surprise by the fireworks show. I really shouldn’t have been surprised, because they do it every night at the fair. It was a pretty good excuse to pull the camera back out.

Coastal Carolina Fair 2011

And with that we hurried to the car so we could wait in traffic. Another successful family trip to the fair. I can’t wait until next year!


BarCampCHS Session Wrap-Up

BarCampCHS Group Photo
Group Photo of the BarCampCHS attendees

Yesterday was the 3rd annual BarCampCHS event, and like last year it was held over at the College of Charleston campus in downtown Charleston, SC. As mentioned in an earlier post, I held a session on Off-Camera Flash. Before I talk about the highlights of my presentation, I wanted to share a bit of the BarCamp experience.

BarCampCHS
30 Seconds To Pitch

After you register and get your bag o’ swag, the attendees gather in an auditorium and the people who plan on holding sessions get 30 seconds each to pitch their idea. As you tell everyone what you plan to do, a counter is counting down behind you (a few people did have to get the mic taken away from them mid-thought). In reality, you only got about 25 seconds to pitch since people started counting down the final 5 seconds. I found it quite entertaining, especially when some mouthy participant trying to hawk a couponing network-marketing scheme went over his 30 seconds and tried to continue without the mic. He was followed by @CaananTully who pitched a session on saving money at the supermarket without using coupons. The crowd applauded loudly. Afterward, the attendees lined up to vote on which sessions they’d like to attend.

With that, sessions began about a myriad of topics, although it was highly concentrated on computer programming. Some of the more popular sessions focused on geek culture, including a session about modifying old Nintendo Entertainment System games such as Super Mario Brothers.

BarCampCHS
Eugene Mah Flaunts His Bathrobe Style

Eugene Mah took a lot of great photos of the days events, and they can be seen here. There is a BarCampCHS Flickr Group to check out, as well as my full set of photos. Twitterer @Pataford has a Ustream channel with some video he took. If you have some content I missed, please let me know in the comments! Now, on to my creative session:

Off-Camera Flash 101 Session


Slides from my BarCampCHS presentation

I started off the presentation by a short introduction and recap of my session from last year on photo editing. I showed some of the photos we made and edited and started talking about the creative use of lighting in the shots. This led to a brief discussion on why you would want to use off-camera flash. I also touched a little on why you would ever use your on-camera flash, and showed an example of fill flash outdoors during a bright and sunny day.

Next, we talked about shooting in manual mode – both on the camera and on the flash. We talked about the benefits of TTL as well as its shortcomings and why it’s important to know how to use manual flash, especially when working with light modifiers. I explained how when dealing with off-camera flash, you can control your ambient light with your shutter speed and your flash power with your aperture settings. Someone asked about ISO settings, and I explained that you want to shoot in your camera’s native ISO when dealing with lighting to produce consistent and clean images.

The next part of the session dealt with the different methods of getting your flash off of your camera. The first method was using bounce flash. I explained that even though the flash is still technically on the camera, the light source is now whatever you are bouncing the flash off of, which is indeed off of the camera. @TheKingOfGames volunteered to be our model as we took some sample shots. We started with a shot with the flash on the camera to reference the difference.


Straight Flash on the Camera

As you can see, the shot is not all that flattering. Someone in the class said “It looks like something you might see on Facebook”. I then showed the differences when bouncing the flash off of the ceiling or wall. In the following shot, I used the projector screen to bounce off of, which was really bright and reflective:


Bounce Flash Off A Wall

You can immediately see the difference in the quality of light. I talked about the softness and direction of the light, which made for a more defined image whereas the straight flash shot was very flat.

Next we talked about using a wire to move the flash off of the camera. The benefit being reliability while being able to cheaply transmit TTL information, with the downside being limitations of the cable’s length. We briefly talked about the different standards in cables, including PC Cables, 1/8″ Audio-Style Cables, and TTL Cables. I had a TTL cable that I use with my bracket, so we took a test shot using the bare flash:


Bare Flash Using a TTL Wire

Since I only had a short cable, I was able to demonstrate the limitation of the distance I could place the flash away from the camera (about arm’s length).

We then talked about wireless flash. I covered the three main methods of shooting wireless: Optical, Infrared, & Radio. We discussed the benefits and issues with each method. Optical is cheap but unreliable. Infrared can transmit TTL information, can be cheap depending on the hardware you already own (it also can be quite expensive if your camera doesn’t support it), and how you can control the flash settings from the camera. It’s also limited to line of sight and is very unreliable outdoors. I took a test shot using the pop-up flash on my D90 in commander mode to fire an SB-600 on a mini tripod to camera right:


IR Wireless Flash Test Shot Using an OmniBounce Diffuser

I spent the most time on radio triggers. I talked about the Pocket Wizards and Chinese knock-offs. I explained that you can buy about six Cactus v5 triggers for the price of one Pocket Wizard Plus II and according to many reviews and tests, the Cactus v5 is more reliable! I also touched on the newer Pocket Wizards and Radio Poppers that are able to transmit TTL information. I explained that for the cost of that convenience, you could be investing in some great lights! Sure it would be nice to justify having the top of the line triggers, but there’s no shame in buying a set of reliable knock-offs when you can achieve the same end-result for a fraction of the cost.


Photo by Daniel Vice @sharpstick on Twitter

I started doing some shots using an umbrella. I demonstrated how to control the flash power by changing the aperture, and then mixing ambient light with flash by adjusting the shutter speed. I showed how to match the ambient florescent lighting and flash lighting by gelling the flash with a green gel and setting the white balance in the camera to florescent.


Umbrella Look

I also talked about sync speed. I demonstrated what happens when you shoot faster than your sync speed:


Shooting Faster Than Your Sync Speed

I then changed the umbrella and set it up as a shoot-through umbrella and showed how it created a different look.


Photo by Daniel Vice @sharpstick on Twitter

I took a few shots as I moved the light around to get a softer look.

BarCampCHS Lighting Session
Shoot-Through Umbrella Look

I also altered the model’s position a bit and added another flash onto my camera at its lowest power setting to try and achieve a small catchlight in his eyes. This was our final result, which will hopefully make for a nicer Facebook profile pic than what we started with 😉

BarCampCHS Lighting Session
Final Shot

We did some Q&A, and I shared some resources for learning about camera lighting. Here’s my list:

joemcnally.com – Joe McNally
strobist.com – David Hobby
zackarias.com – Zack Arias
kelbytraining.com -Scott Kelby

I also wanted to add a pair of new eBooks by Piet Van den Eynde on Craft & Vision. You can pick up each of the two eBooks for $5 each, or buy them both at the same time for only $8. He’s done an excellent and thorough job in the first book of introducing the reader to off-camera flash, and takes you much further in the second one. I think it’s definitely worth more than $8!

Tech Specs For My Presentation

Gear:
Camera: Nikon D90
Lens: Tamron 17-50 f/2.8 VC
Flash: Nikon SB-600
Light Stand: Manfrotto 5001B
Umbrella: Photek Softliter II
Wireless Triggers: Cactus v5
Gels: Cokin Photogels
Mini Tripod: Jobi GorillaPod

I ran the presentation on an iPad hooked up through a projector using Keynote for the slides and Photosnitch for the live demo. I used an EyeFi wireless SD card to transmit the photos to the iPad sans cables.


DIY Speedlight Diffuser

As I mentioned in Saturday’s post, I have a wedding shoot on the beach this coming weekend. The challenge is that it is going to be an outdoor event – both the wedding and reception! I’m going to be thoroughly tested on my lighting skills because I’m going to need to light most shots in some way. It gets even more challenging when you realize that it’s a whole hell of a lot windier on the beach. That means umbrellas and soft-boxes are going to be near impossible. Not that I won’t try – I ordered a set of tent spikes and rope to add to my sandbags. I also ordered some stronger metal umbrella brackets.

Lets get back to the subject at hand. As I ran through the day’s schedule I started envisioning each setup. when I thought about the reception, which will start around sundown, I realized that I will not be able to rely on a light stands and off-camera lighting. I spent some time researching various methods. I have a Flash Bracket, which allows me to move the flash up and off the camera at about arms length (I usually have it set about 12″ to the left as well). This is perfect for these kinds of events. The light is still pretty hard, but at least it has direction. I also have a Sto-Fen Omni Bounce, which is fantastic if you’re indoors as it lets you bounce the flash off of the ceiling or a wall while throwing some light 360˚. Alas, I’ll be outside!


Sto-Fen Omni Bounce

I started doing some research. There are quite a lot of solutions out there, and the ones that looked most promising were also well over $100.00. I liked the idea of the Lastolite 20″ umbrella that’s meant to be handheld. My bracket actually has a hole for an umbrella shaft and I could easily mount it. Perfect! Except it’s no longer available. B&H does have a kit with it, but from the reviews it would appear that there are quality issues with it and that makes me think there is a valid reason that it’s on backorder. What to do now?

I started to look for DIY softboxes and modifiers, There are a lot of great options out there, and I was going to have to try something. I have a week to get ready, so that gives me time to figure it out. After dinner, we stopped at the local Publix grocery store and I saw this plastic flask hanging on a hook in one of the isles. The curvature of the white translucent bottle reminded me of a modifier by Graslon. Speedlights started to pop in my head (OK, lame), and I threw the $4.00 flask into the cart.

DIY-1 The Pedrini Wine & Bar 10oz Plastic Flask
The Pedrini Wine & Bar 10oz Plastic Flask

I was delighted to see that the silver cap was false – a much smaller white plastic cap was hidden underneath (which makes it look slightly less obvious that I’m sticking a plastic bottle on my flash). I grabbed my flash and outlined the two longer horizontal sides on the back of the flask with a Sharpie. I then put a line in the center to make an H. This is how I marked my incision:

DIY-2 Mark Your Incision DIY-3 Cutting Time
Mark Your Incision

I used a locking straight razor to cut the H. The plastic is pretty thick, so I had to give it a bit of pressure to make the cuts. Take it slowly and cut away from your body. I still have a 1″ scar on my wrist from a razor incident that I got from cutting up a cardboard box when I was a teenager. 1/2″ to the left and I might not be here today!

DIY-4 Ready to Attach
Ready to Attach

Now, slowly fold the two flaps outward. You should be able to snugly slide your flash head right in. Self-adhesive velcro or gaffer’s tape would work perfectly to hold it on. I actually put my Omni Bounce on my flash and slid that inside the flask. I shook it pretty hard and the thing wouldn’t budge! It’s not necessary if you don’t have an Omni Bounce, but it sure does make things easy.

DIY-7 Attached
Attached

DIY-5 It Works!
It Works!

OK, now it’s time to test it. I put the flash on a Cactus v5 wireless trigger and fired her up. She’s a thing of beauty. The flask adds about 5x the surface area of the Omni-Bounce to the flash. Larger light sources = softer light. Let’s try it on a person. My daughter was practicing her keyboard in her room, so I shut her lights completely off and snapped this:

DIY-6 Test Shot of Mac
Test Shot of Mac

She looks great! There’s direction to the light from being on my flash bracket, there’s an even spread, and it’s a bit softer than a bare flash head. Mission accomplished! Now I’ll have to see how she performs in a real shooting situation. More to come…


One Of A Kind

RIP

Taken on my iPhone in Best Buy seconds after I got the phone call from my wife that Steve Jobs passed away

Where to begin? What to say? I guess the only way to express how I feel about the man behind Apple is to share my own relationship with his contributions to modern life as I know it.

I didn’t grow up with computers. Sure, my brother had a Commodore VIC20 that we would hook up to a small black & white TV that we had in our bedroom, but other than that I grew up with minimal technology. I was an art and music nerd in my teenage years. I cared more for Gibson guitars and Marshall stacks than this AOL phenomenon my other less artsy friends were into. When I first attempted to go to college right out of high school, it was for graphic design. It was the first time I laid my hands on a Power Macintosh. I found it threatening. I spent all of my free time playing scales and writing lyrics, how would I ever have time to learn how to use a computer? Needless to say, I failed at that first attempt at higher education within the first semester when I dropped out to go on tour with my band.

Fast-forward 5 years and the band was winding down. I got married and my wife, unlike me, grew up with computers. The first major purchase we made together was an iMac in glorious translucent green. It only took a couple of days before I was a full fledged, card-carrying Apple fanboy. In fact, I was so engaged by the iMac that I wanted to learn as much as I could about computers in general. I went back to school to do just that. I built PC’s and talked endlessly about the latest technology with anyone who would listen. I was baptized in the “Steve Jobs reality distortion field”. Some people think that phrase is an insult, I think it is the ultimate term of endearment for the one man who could bend what we think of as possible into something we could feel in our soul.

I’ve made a living from technology and it has provided my family with almost everything we have today. I can’t think of another company that could have transformed this music lover into a technologist. Steve Jobs is a man who changed the world as we know it, and more importantly to me, his contributions to the world changed me.

Thanks, man.


Privacy Settings
We use cookies to enhance your experience while using our website. If you are using our Services via a browser you can restrict, block or remove cookies through your web browser settings. We also use content and scripts from third parties that may use tracking technologies. You can selectively provide your consent below to allow such third party embeds. For complete information about the cookies we use, data we collect and how we process them, please check our Privacy Policy
Youtube
Consent to display content from - Youtube
Vimeo
Consent to display content from - Vimeo
Google Maps
Consent to display content from - Google