

BarCampCHS 2010 Photo Session
Before I get into my recap about my photo editing session at BarCamp Charleston 2010, I wanted to share with you a quote from an interview I heard this morning while walking my dogs. The great Ron Bennington was talking with the legendary Quincy Jones, and Mr. Jones said something that just sent shivers down my spine. “I always wondered who was the designer of all of this stuff…. From races, to flora, to the whole universe. It’s astounding design” to which Ron responded, “It’s interesting how we all knew that when we were babies – everything was amazing, and then somehow we just forget about it”. To that Quincy Jones told Ron, “I never forget”. The man is the quintessential artist, and he summed up the reason why I ever wrote a song or made a picture. Life is amazing, and we should never forget the details of what, to quote Quincy Jones, make it so astounding.
 OK, so back to yesterday’s event. I got up at an ungodly hour to go to BarCamp, but when I found out how far some people traveled to be there (a bunch of people from the far reaches of SC, NC, Georgia, and even one guy from Italy), I quickly got over my grogginess. I wish I knew this beforehand, but after we checked in we had to pitch our session ideas to an auditorium filled with attendees. I had nothing prepared, which was particularly evident when the people doing a salsa session has music and brought out dancers for their 30 second pitch! After I stumbled though mine, we all had to anxiously wait for the schedule of sessions to be made. I got stuck with the last hour of sessions of the day, which was at 5:00PM. That was cool – it gave me plenty of time to get the shots I needed for the session I was presenting.
The Photo Session:
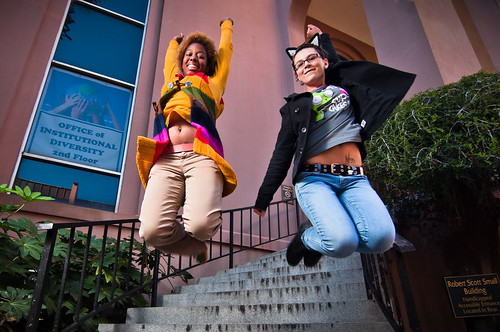
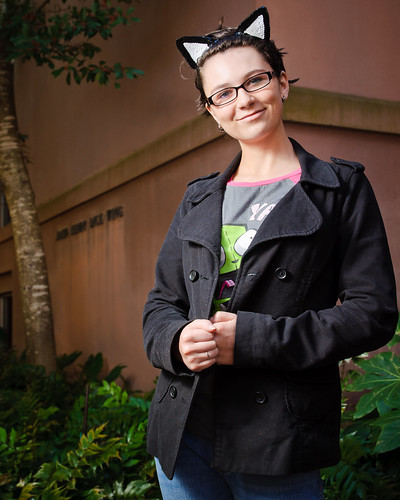
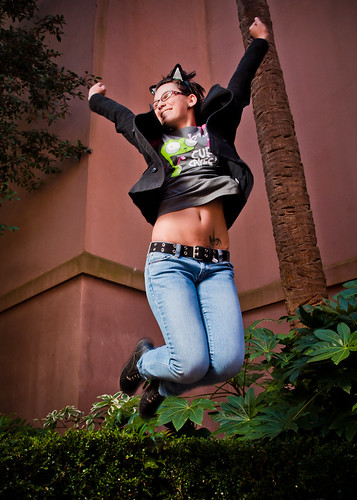
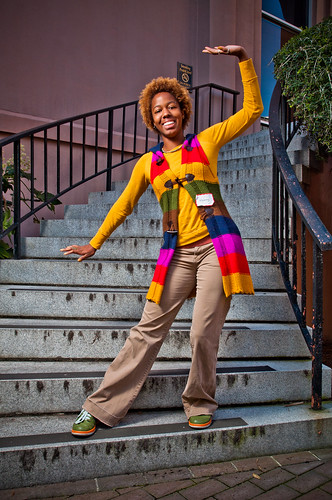
The first person I tapped to be a model for me was a girl named Ebony, who was wearing an outfit that looked like she knew she was going to be in a photo shoot. She’s got the look of a model, but I don’t know if she actually knows that yet. When I met up with Ebony prior to the portrait session, she was talking to another girl who was wearing cat ears on her head and was appropriately named Cat. Bingo, another outgoing girl who was very photogenic! I enrolled her into my posse of tech conference models.
After I shot each of them individually, I asked them to pose for some shots together:
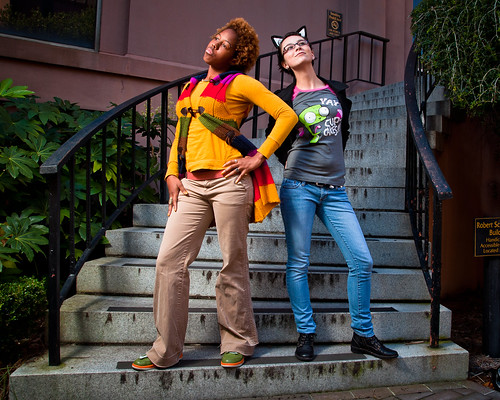
The girls were awesome, and as you can see in the shot at the top of this post, they were very energetic and easy to direct. Once we started and the lights were flashing while I was barking out directions, a small crowd started to gather around us. I overheard someone asking another bystander if this was an outdoor conference session on photography – I guess in a way it really was. That’s the beauty of BarCamp – there is no rigid structure, it’s all done on the fly. Even a local reporter, Andy Paras from the Post & Courier tweeted the photo shoot!
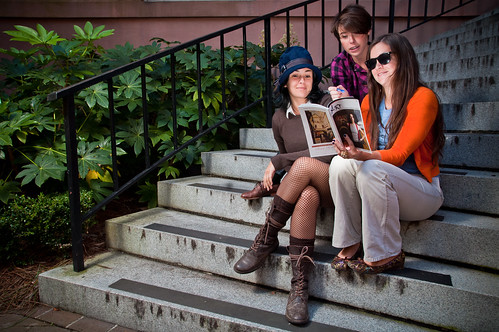
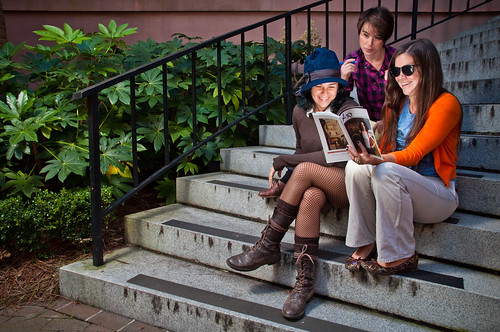
After I was done shooting Ebony & Cat, I needed at least one more victim, er, I mean model. I saw two girls standing nearby and told them what I was doing the shoot for and asked them if they would like to participate. They seemed happy to help out. Now, I didn’t want to do the same thing I did with the other two girls, but I did want to use the same location. I asked them what they were at the conference for, and they told me they were attending for art. Awesome! I pried a little deeper and found out that they are behind Charleston Art Magazine, and they had a copy of it with them. OK, we have something to work with here. I had Stacy and Olivia sit on the stairs and read their magazine.
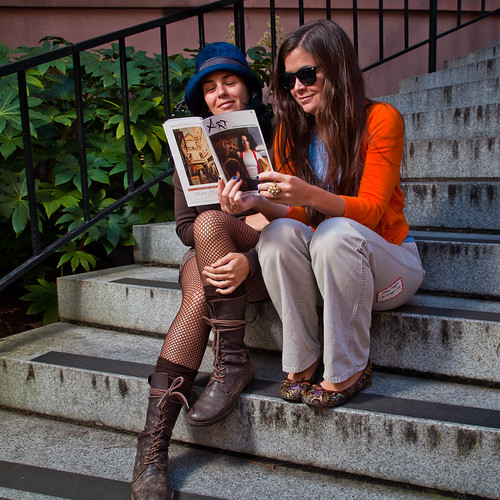
It was looking great and then a third girl came over and wanted to join in as well. This created a problem, because for the way I wanted to position them in the shot, a shadow was being cast on the newcomer. I grabbed my other SB-600 flash and handed it to Stacy, one of the art mag girls, and told her to point it at the inside of the magazine as a flash bounce. Now we’re talking – all three girls had beautifully lit faces.
I didn’t even have to give these models much direction after that because they were having a lot of fun with the whole thing.
Developing Photos In A Digital Darkroom Session:
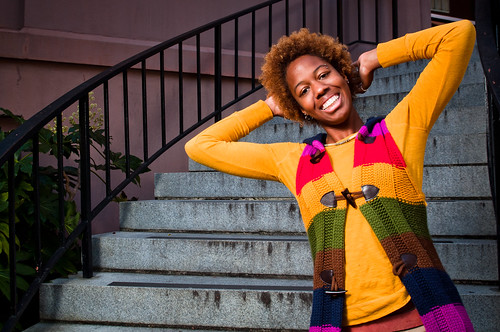
During my session on editing photos in a digital darkroom, I picked 3 photos from the shoot to edit. The first one I did was of Cat jumping alone. Here’s the original shot of her unedited and shot in RAW (the following originals were all converted to JPEG for the web in iPhoto):

We talked about the basic theories in editing photos. Our goal with this photo was to show the high energy of Cat. We started out by minimizing the distractions and problems. The biggest problem with this shot is my umbrella in the top corner and the bright sky just underneath it peaking through the leaves. We decided the most effective way to eliminate this problem was to crop it out. We also wanted to slightly darken the white parts of the cat ears because they were reflecting the light a lot and drawing the eye away from her expression. We then added a graduated filter to the bottom left corner because the bright foliage was pushing the eye out of the frame. We added some vignetting to further pull you into the center – the lines of the palmetto tree and the building all add to the energy and direction of her jumping, but with the vignette we are able to stop the motion from immediately leaving the top of the frame. Here’s the final edit:
Next up was a photo of Ebony on the stairs. Here’s the original (click it to enlarge it):

Once again, we needed to minimize or remove any distracting elements. In the top left corner, the pole from my umbrella crept into the frame as well as a leg from the stand on the bottom left corner. Easy stuff to miss on the 3″ LCD screen of your camera. This time a crop wouldn’t be good because we agreed that the composition was just right and we didn’t want to change it at all. So, we discussed the options, and decided to use the spot removal tool in Lightroom to remove the unwanted objects. The top one was easy as the wall was a flat surface devoid of any patterns. The bottom was a bit more difficult because on the pattern of the stones. We eyeballed it to recreate the lines of the stones with a couple of spot removal areas, and it worked out really well. After that, I wanted to demonstrate how to use the adjustment brush to whiten her teeth. The problem was, she, nor Cat, were in need of it! We went through the motions and shared a laugh when I went the wrong way on the brightness slider and turned her teeth black. After that I wanted to show everybody how to diminish the bags under her eyes, but once again, she didn’t need it. Ahh, to be young again! Again, we went through the motions and dumped the file into Photoshop and used the clone stamp tool, set to lighten, to slightly diminish the extremely minimal darkness under her eyes. Back in Lightroom, we talked about the tone curve, and used it to adjust the contrast and then used the basic panel to brighten it up and pull the saturation ever so slightly. We also talked about the name badge she had plastered on her sweater, but for the sake of time I decided it would be a bit more elaborate to remove than the stuff in the corners and we just talked about the possible ways to use Photoshop 5’s new content-aware filter to remove it. I might try that on my own on another shot of her since I really haven’t given that tool a good test drive yet. Here’s the final shot:
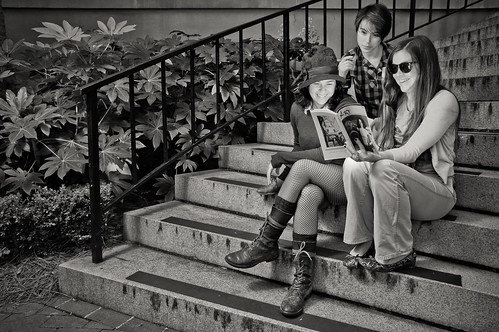
For our last photo, I wanted to talk about techniques for converting to black and white. I used a shot of the Art Magazine girls for this edit. Here is the original of this shot:

First off, we got rid of that sneaky light stand leg in the bottom left corner. We used the spot removal tool, which we decided was not really appropriate this time around, but would have to do since we only had a few minutes left in the session. I also adjusted the crop to remove the windowsill at the top of the frame after trying to darken it with the paint brush tool because I also wanted to get rid of the handrail on the right. Normally, I wouldn’t convert this image to black and white because I like the color of it, but it does have some great elements for a monotone image – great lines, the awesome texture of the foliage, and the light on the girls’ faces. So, we talked about the conversion process a bit. I showed them that we could simply remove all of the saturation and vibrance to make a black and white image, or we could just click on the black and white option of the basic panel in Lightroom to open up some fine tuning options in the B&W panel. We went through adjusting the different color sliders to see the effect they had on the image. Then we discussed a third option that turned out to be what we finally used for the conversion which was exporting the image to Nik Software’s Silver Efex Pro. We quickly ran through the presets and picked the “full spectrum” preset and made some minor tweaks to the contrast and structure sliders. Here is the final image:
And here’s the same image again in color, because frankly, I still like it better in color!
And with that the session ended, as did the “unconference” that is BarCamp in Charleston, SC. I was honored to be a participant in this years event and can’t wait until next year!
Pingback: Tweets that mention BarCampCHS 2010 Photo Session | JWNPhoto.com -- Topsy.com
Hey Joel,
Fabulous shots! I saw you working these shots but didn’t have the privilege of attending your session.
BarCamp was awesome! This was my first and I too, will be much better prepared next year after seeing first hand what to expect.
Thanks for sharing your work and your thoughts.
See you soon.
Leigha
Thank you Leigha! The biggest problem I had with BarCamp is that I couldn’t clone myself to see more!
Pingback: The Fall Is Awesome! | JWNPhoto