

My Theory On Post Processing
I wanted to focus my philosophy on photo editing before I give my session on developing photos in a digital darkroom at BarCampCHS this weekend. To me it is an important element in photography that is often skipped by many. I don’t know if it is because people feel that it is too difficult or too time consuming, but since when is anything worth while easy? OK, here goes…
When I was a musician and my band recorded our first CD, we didn’t know anything about mastering. It was something that we cheaped-out on and the sound quality suffered because of our ignorance. We put all this effort into making a record, but didn’t put the right icing on the cake! Post processing is like sound mastering. You don’t need to change the product, you are just trying to enhance it – polish it up and make sure it looks the best that it can look.
This doesn’t mean you should ever shoot with the mindset that you can fix it in post. You should make the best digital negative you can in the camera. The ideal post processing situation is one that takes only minor tweaks to establish your final product. Proper exposure means a clean digital file, and good composition will yield you the highest possible resolution. These are skills that still need to be mastered, but the skill of post processing is just as important.
For my realistic editing techniques, I’m looking to make the photo pop, or stand out. The edits are subtle, and for most people they are not even noticeable, but they are very deliberate. I want to enhance a point of focus, or guide the viewer’s eye through the photo to drive home whatever point the photo is trying to make.
For more creative editing, when I’m trying to create a certain look, I start out by experimenting with different techniques while capturing the image that will allow me to successfully manipulate the file afterward to make my vision a reality. Sometimes there is a fine line between photography and digital imagery. It’s up to you how far you want to take the editing process. I sometimes will dabble in the unrealistic representation of a subject, but I would much rather leave the subject in tact and use the editing tools to further define a feeling or meaning though saturation, dodging, burning, contrast, etc. Most of the time that mood or feeling was there when I made the photo, but sometimes you want to smack the viewer over the head with it. That is completely OK, because there are no rules to this!
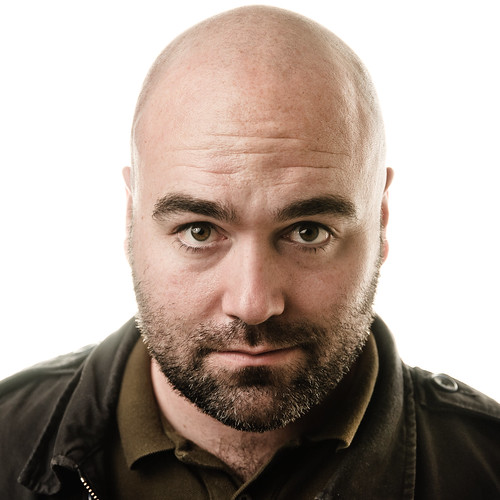
Lets take a look at a self portrait I made yesterday for my “No Shave November” personal project. I want to show you the original file first. I shot this in RAW (which is the file format you want to shoot in if you plan on editing your photos). RAW doesn’t show you all of the fancy in-camera optimizing magic that your camera is capable of doing when you shoot in JPEG. It’s the raw data that your camera sees. it’s a digital negative. So here’s the RAW file of my giant head from yesterday (converted to JPEG for the web in iPhoto):

I chose this photo to show you because the shooting method I used to capture it was done deliberately to capture a specific look that I wanted to realize in Lightroom. I was standing a few feet in front of a wall, and there was a wireless Nikon SB-600 flash on a stand right behind me pointing at the wall. In front of me is another SB-600 shooting into a Photek Softlighter umbrella. I shot at f/4.5 at 250th of a second and ISO 200. There was a lot of light going on. I wanted to cut the ambient light and only capture the light from the flashes, so I shot at the fastest speed possible and adjusted accordingly. Admittedly, I could have adjusted it a bit more to get an even better exposure, but doing a self portrait is a pain in the ass, so I’m happy with what I got!
I brought the photo into Lightroom and made some heavy deliberate tweaks to achieve the look I was going for. The major changes are illustrated here in the basic panel of Lightroom’s develop module:

The other panel I wanted to show with you here is the Tone Curve panel. Notice the very strong “S” curve. This is a typical high-contrast curve. The beauty of a program like Lightroom is that you can visually tweak this curve to your taste. There is no mathematical formula to this, it is purely an exercise of taste.

Also, as part of my project, I limited myself by only using a square crop, so this is my final image after I cropped it and did some other minor tweaks such as lightening my eyes and diminishing the bags under them:
As you can see, the integrity of the image itself has not changed at all, but the quality of it is much better. Sure, if I shot in JPEG, the image would look better than the RAW version I showed you straight out of the camera, but the edited version not only looks better to me than anything my camera could do for this type of shot, it also looks exactly the way I envisioned it to.
On Saturday, I plan on shooting some photos in the morning at the conference, and then I’ll walk you through the editing process for three different techniques for developing them. It should be fun and I’m excited for it – I hope you are too!
Pingback: Tweets that mention My Theory On Post Processing | JWNPhoto.com -- Topsy.com