Monthly Archives: January 2011

Winter Desaturation

Winter Kids
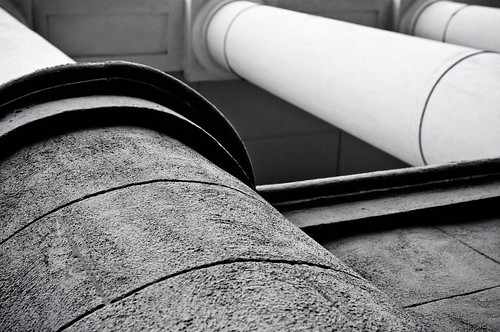
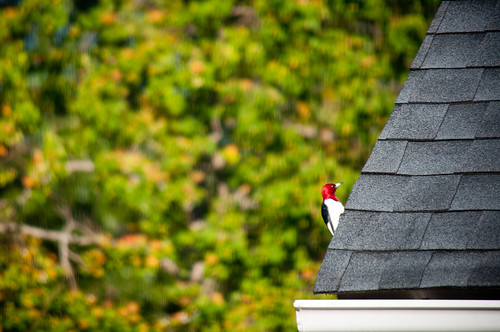
1/250th of a sec | f/5.6 | 300mm | ISO 1600

A popular effect in many casual portraits is the washed-out or desaturated look. Taking cues from high fashion photography, people tend to look more attractive as the facial features get even and blown out while retaining a high contrast with their eyes, clothes, and background elements. The difference is in the deliberate heavy-handed approach – you’re not trying to play a photo trick here, you’re making an obvious change to your photo’s look.

Winter Kids
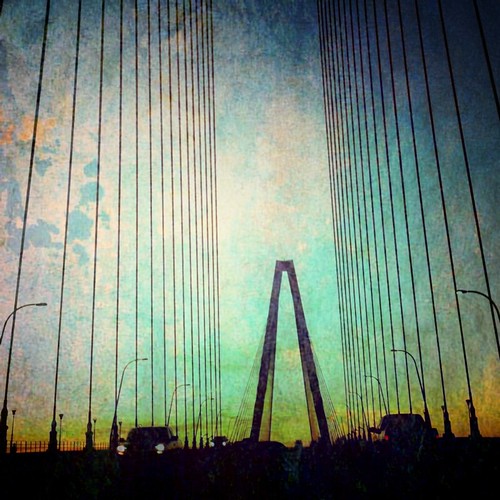
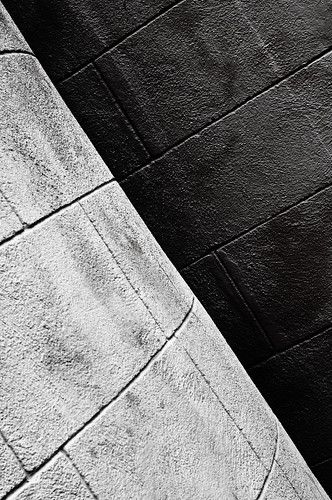
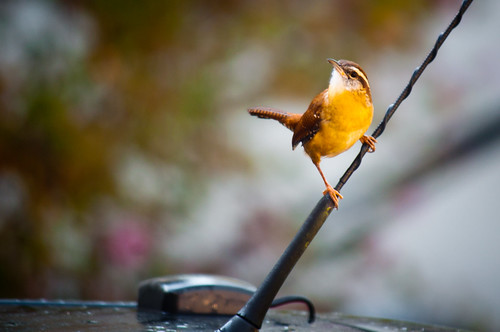
1/200th of a sec | f/5.0 | 180mm | ISO 1100

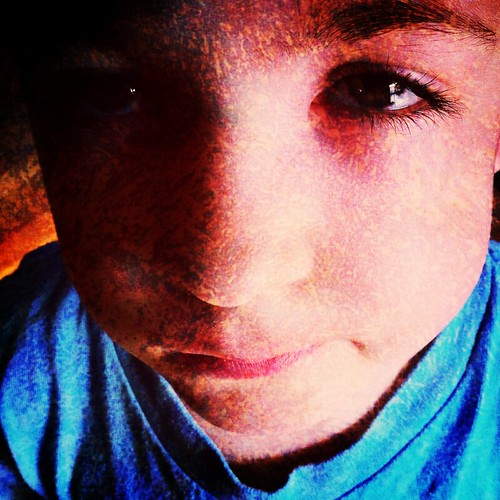
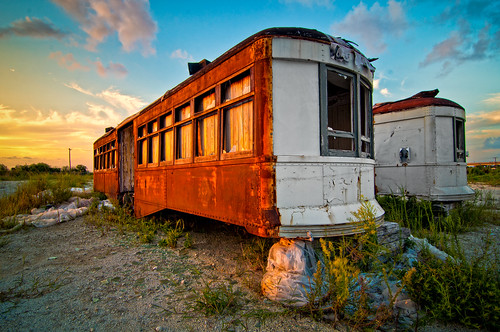
This effect works best for me when making outdoor photos, and depending on the feel I’m going for, the color of the sunlight and the time of year determines the best course of action. For a bright sunny day, where the grass is green and the flowers are blooming, it’s best to use directional sunlight in the morning or late afternoon and put the subject between you and the sun. The back-light will give a warm yellow halo effect around your subject (make sure to use spot metering to expose for your subject’s face, because matrix metering will be way off when shooting into the sun).

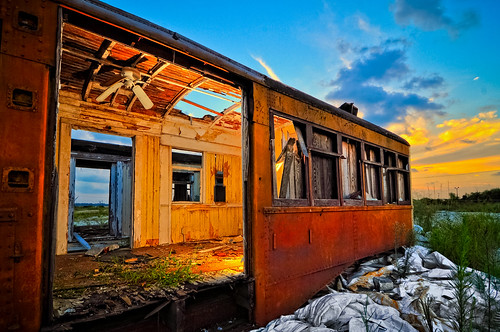
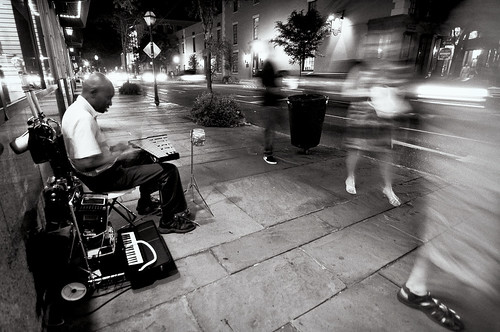
For winter photos, shooting on an overcast day will naturally give you a cold blue color temperature to match the dead grass and barren trees. In the shots here, I was deliberately going for photos that feel like winter in the south. Sure, the temperature was really warm for January when I took these, but the environment and color still help define these as winter/fall shots. The key here is reign in the yellow grass so that it’s no longer a warm yellow. I started the two shots above using Nik Color Efex Pro’s Bleach Bypass. I made more use of the effect’s local contrast slider more than anything else in the plugin. After I did that, I brought the photo back into Adobe Lightroom and performed some tweaks to maximize the effect as detailed below.

Adobe Lightroom Basic Panel

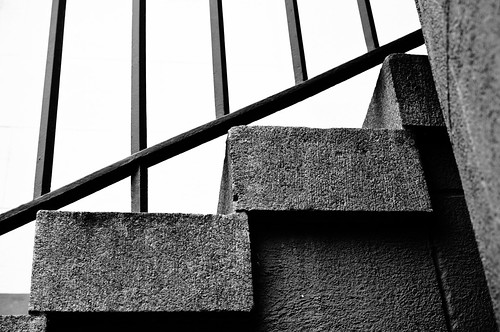
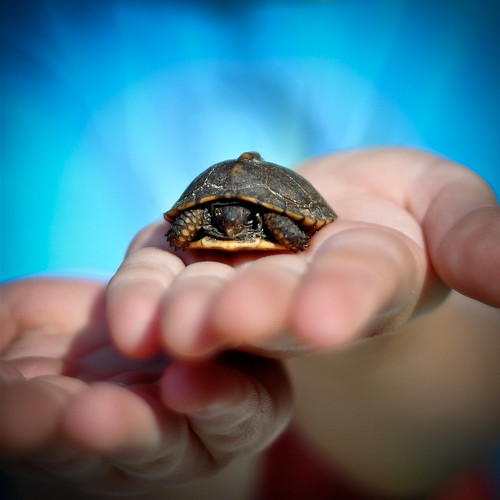
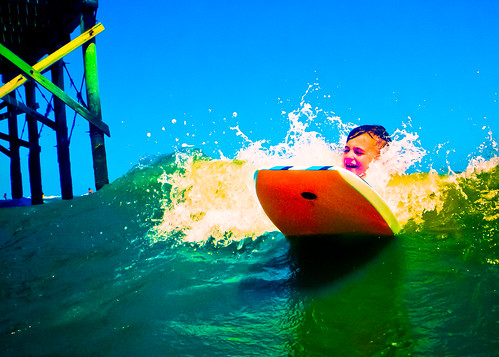
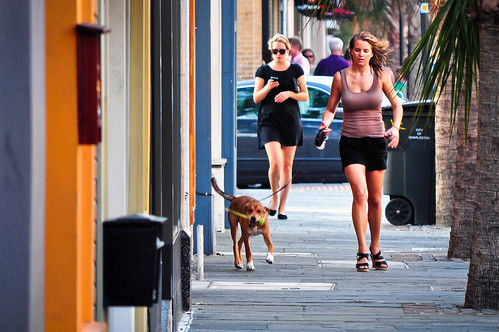
What if you don’t have Nik Color Efex Pro? You can still get similar results using just the basic tools available in Lightroom or Aperture. This shot of my daughter was created without the use of the Bleach Bypass filter. It is less dramatic, but for her I didn’t particularly like the hardness of the filter.

Winter Kids
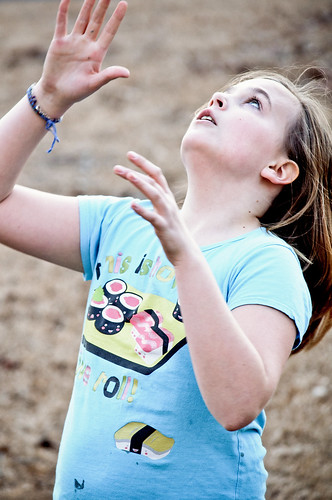
1/200th of a sec | f/5.0 | 170mm | ISO 1600

You can see that I needed to be a bit more heavy-handed with my Lightroom basic adjustments without the use of Bleach Bypass:

Adobe Lightroom Basic Panel

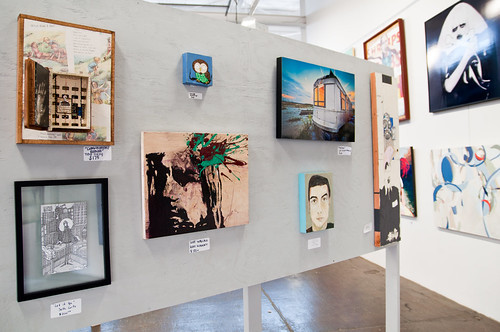
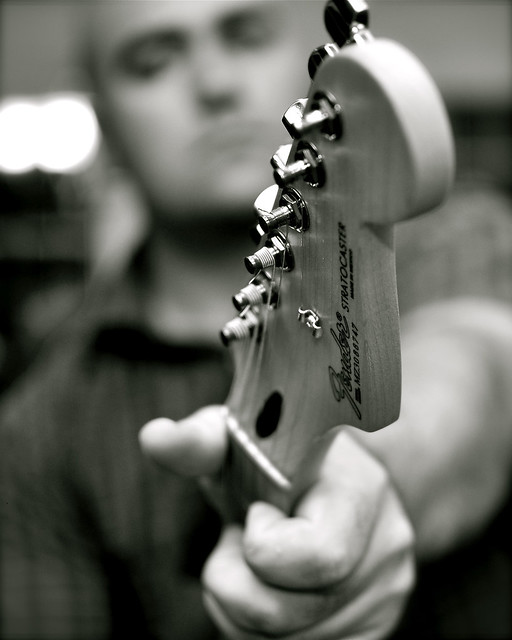
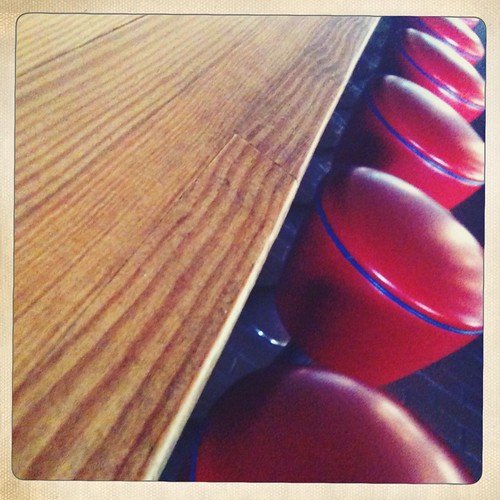
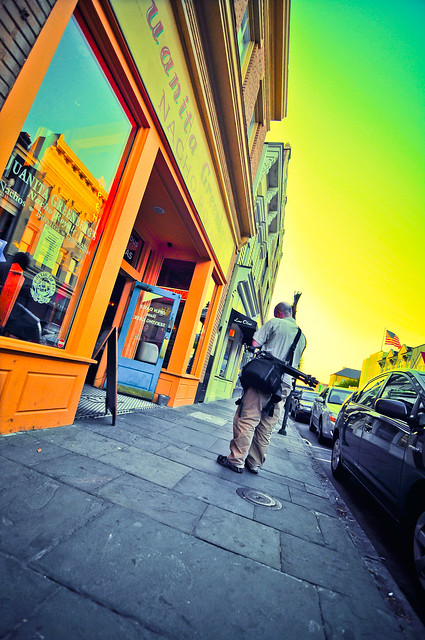
In the shot below, I used a different approach which resulted in a much warmer effect because I wanted to have contrast between the pavement and the grass. Although it’s more saturated than the other photos, it still has that grainy high contrast and desaturated feel to it. Another factor that is more of a way of exploiting your lenses shortcomings is to shoot at a high ISO. Depending on the lighting, this can give your shots a graininess that looks quite gritty. I’m pretty sure if I was shooting these with faster glass, I would have chosen to add the grain in later to taste, but since I wasn’t, I chose to take advantage of the high ISO look (and by take advantage, I mean I didn’t have much of a choice).

Winter Kids
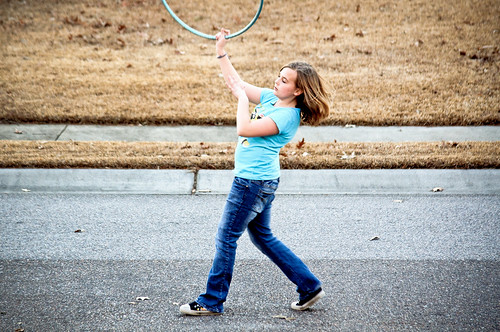
1/200th of a sec | f/4.8 | 140mm | ISO 800


iPhone Photo App Review – 100 Cameras In 1

My Creation with "100 Cameras in 1"
The Albermarle | Charleston, SC

There are hundreds of good photo manipulation applications in the iTunes App Store for the iPhone, and a lot of them seem to favor the trend of vintage photography – a trend that is exploiting the poorer resolution of mobile phone cameras when compared to today’s full featured cameras to create a comfortable photo of moments or things that are reminiscent of the shots from affordable cameras from the time before digital. “100 Cameras In 1” attempts to separate itself from the Hipstamatics and instagrams that lead the charts by doing two unique things in it’s latest release.

My Creation with "100 Cameras in 1"
The Albermarle | Charleston, SC

The first thing that sticks out for me in this app is the use of texture blending as an effect. By blending a layer of adjustable translucent texture – from rough surface areas to stones and splatters, you can add a graphical element to your photos that look as though they were printed on recycled paper with expired chemicals and a clumsy hand. This might sound messy, and to the heavy handed photo editor, it can very well be, but it can also make a common image very uncommon. Not that there’s a substitute for composing a good image, but it can force attention to an image that might get overlooked – bringing out the subtleties in a composition through it’s brand of distracting imperfections. One improvement on this would be the ability to add your own custom textures.

My Creation with "100 Cameras in 1"
Arthur Ravenel Jr. Bridge | Mt. Pleasant, SC

This photo made while crossing the bridge above was a throw away shot that I made while trying to capture this one. In an effort to prove my point, I took this otherwise ho-hum image and gave it new life with 100 Cameras In 1. While it’s still not my favorite image by any means, it is more interesting to me than the original. The texture and color effects add mystery and intrigue – it almost makes you search for a deeper meaning to the photograph. It tasks you to search for a reason amongst the chaos of imperfection.

The other feature that is new to version 2 is the ability to change each of the 100 presets with a granular slider. Depending on the nature of the effect, “the slider will change the effect of the texture using overlay, hardlight, luminosity, the texture itself, or other methods.” states the developer, Stuck In Customs (AKA Trey Ratcliff). What this does is allow you to add a hint of an effect and combine it with other effects to create something truly original without overdoing it. The results are simply amazing, and it becomes almost too easy to create images that would take a good level of expertise in Photoshop to replicate through more traditional techniques.

My Creation with "100 Cameras in 1"

The photo above is of my son – I originally took it on New Year’s day to SMS it to our pediatrician because he was swelling up from an infection. I imported the photo into 100 Cameras In 1 and started playing with the effects. I ended up with an overly saturated image using a texture that created a type of effect on his skin reminiscent of Vincent van Gogh’s painting style.

Here’s a promo video from the Stuck In Customs website. They have a page dedicated to information about the app, including a bunch of sample photographs as well as news and tips.

For only $2, you really shouldn’t even think twice about adding this fantastic app to your iPhone arsenal.


Recalibration

B&W Lines
1/80th of a sec | f/7.1 | 34mm | ISO 200

Like many a tool or machine that you use to get a job done, you creative mind needs to be re-calibrated every once in a while to ensure it’s operating to its full potential. If you feel like your in a slump, or if you’ve taken a break from shooting for awhile, a great way to get back into a groove is to revisit some of the basics.

B&W Lines
1/50th of a sec | f/7.1 | 50mm | ISO 200

I’ve been busy with life and haven’t had time to do much creative shooting lately which has been feeling a bit like a rut, so yesterday morning I picked a building that I pass by quite frequently and pulled over to shoot the basics for a few minutes.

B&W Lines
1/80th of a sec | f/7.1 | 38mm | ISO 200

What were the basics that I was focusing on? Well, the primary theme I set for myself for this set of pictures was lines, and the secondary theme was texture. I concentrated heavily on my composition and moved around to deliberately position the forms of the building in ways that pronounced the direction and conversion of the lines. The best way to define texture in this situation is to search for contrasts – light against dark, straight against curved.

B&W Lines
1/250 of a sec | f/2.8 | 40mm | ISO 200

By getting close and choosing the elements of the photo sparingly, you can find interesting design in most any subject. Once you start to see some of the possible images, the creative juices start to flow and before you know it, you’re shooting in the zone. I believe it’s extremely important to exercise your photographic eyes and to do that, you should properly stretch out by revisiting the basics and re-calibrating yourself.


Best Camera Challenge

This has nothing to do with finding the best camera, so sorry if the title misled you. This is about a photo contest sponsored by PDN Magazine and commercial photographer (and iPhone app developer) Chase Jarvis called the Best Camera Challenge. The reason I’m excited about this contest is because it’s a photography contest of photos made entirely on mobile phones. I’ve written before about how much I love making photos on my iPhone. I truly think that having a huge array of photo applications from 3rd party developers on a single camera is going to pave the way for future professional cameras. Imagine having the ability to load applications from other companies besides your camera’s manufacturer on your DSLR – it would be amazing to say the least.

So, here’s the begging part of the post – I’ve submitted seven photos into the contest, and I’m asking you for your vote. It’s easy – here are the rules from the contest website:

In order to vote you need to provide a valid email address, and only one vote per email address is possible. If after voting the first time, you decide to vote for another image, the first image you voted for will lose that vote.

The “People’s Choice” is a section apart from the rest of the contest and the votes will not influence the judges. A photographer would seek votes in order to win the “People’s Choice” section alone. The winners for the other categories will be determined by the judges.

So, you can view all of my entries on the contest site here, or pick one from the thumbnails below. That’s it – Thanks for helping me out 🙂


Photo Mystery Revealed

Trolly, Urban Decay, Sunset

The photo above, which I have been calling “Abandoned Trailer” (and is also available to purchase as a print in the online store), was a mystery to me. I didn’t know why there were two of these sitting in the middle of a field all busted up with plastic wrapping laying on the ground all around them. I proudly displayed this photo at last year’s Kulture Klash Arts Festival, as well as received an honorable mention for it in the 2010 Coastal Carolina Fair photo contest. I had no idea about the actual history of my subject, until today.

Kulture Klash Art Display

I happened to be showing some of my work to some real estate agents at RE/MAX Advanced Realty in Mount Pleasant, SC, when the broker in charge, David Wertan, told me that he sold the two trolley cars a few years ago.

Abandoned Trailers
1/15th of a sec | f/11 | 11mm | ISO 200

David told me that the two trolley cars were actually somebody’s home in Charleston, and the owner, Jake Varner, had the two cars set together with an a-frame roof attached to the top and a porch in front all the way back in 1938. In 2005 David sold the two trolleys for Varner to the Magnolia Development group for $40,000. The group had planned to restore the cars in hopes to flip them for a profit. They tried to wrap the cars in plastic to protect them from the elements, but they have been vandalized so much that the task of restoring them has become very expensive.

Abandoned Trailer
1/30th of a sec | f/10 | 11mm | ISO 200

The local Charleston newspaper, The Post & Courier, has an article with all of the gory details. Now I know what they are and why the trolley cars are there – which was an unexpected thing to learn today, but I’m excited to now know. Do you have any photos that you’ve taken of something that was mysterious to you and wondered what the back story of the subject was? Did you ever find out?


Shallow Depth Of Field 101

Day 31 - Rock & Roll Living Room
1/30th of a sec | f/1.8 | 35mm | ISO 200

This is a post for the curious photography fans who have looked at a picture and wondered how to get control over making parts of the photo blurry and the main focal point razor sharp. The phenomenon is called a “shallow depth of field”, and what that means is that because a camera can only focus at one precise distance, the plane of focus in your photo is very small or shallow. In layman’s terms, it translates into this: If you have a large depth of field, more of your photograph will appear to be in focus, if you have a shallow depth of field, your focus is more selective. So, how do you control it?

The secret is a combination of things – Mainly your aperture, lens focal length, and your proximity to the subject. Let’s dissect the photo above to illustrate the effects of all of these elements to create that image.

First off is aperture. Aperture simply controls the amount or volume of light you let into the camera when the shutter opens. The larger your aperture, the more light is allowed in. The tricky thing to remember when you first learn about aperture is that the smaller the f-number, the larger the aperture. The effect on depth of field is that the larger the aperture, the shallower your depth of field becomes. The photo above is set at a very large aperture, which is written as f/1.8.

The effect of a shallow depth of field can’t be dialed in just with a large aperture, your lens’s focal length and the distance between your camera and your subject are just as important. I can shoot that same scene using the same settings, but back up the camera 10 feet and focus on the same spot and my whole body and most of the background will be in focus. That is because at 35mm, I’m at a relatively wide focal angle (even though on my cropped sensor D90, this is more like a 50mm lens, but the lens still performs as a 35mm lens optically – that’s a post for another day). So, in order to get the shot above I needed to put the camera very close to the subject (which is me BTW, this was a self portrait). In fact, when I made this photo, I had the headstock of my guitar only inches away from the lens. I chose my 35mm lens to take it because I wanted there to be a hint of the facial features defined as well as fit my upper body in the frame. In the shot below of my son holding a baby turtle, I used a 50mm lens and you can see that beyond the hands, everything becomes just a wash of color.

Day 51 - Baby Turtle
1/2500th of a sec | f1.8 | 50mm | ISO200

Since the focal length of the lens is greater and I’m probably about the same distance from my subject in both photos, you can see the difference that focal length of the lens makes.

What about the quality of the out of focus area?

The quality of the out of focus area is sometimes referred to as “bokeh” (which is a word that for some reason gives me the creeps). It’s based on the Japanese word “boke-aji”, which translates into “quality of blur”. Some fans of bokeh will define a good blur quality by the shape, size, and definition of the points of light that are out of focus. Basically, each point of light will take on the shape of the aperture opening, which is generally circular or polygonal. At a large aperture such as the two photos above, the blur is generally smooth. In the photo below, the aperture is a bit smaller, and you can see the points of light as circles in the trees behind the subjects.

WHES Chorus Events 12.4.2010
1/125th of a second | f/6.3 | 85mm | ISO 450

Artistically, there is no right or wrong when it comes to bokeh, but it does help to understand how to control it – which in many cases comes down to the limitations of your lens. Below is an example of what I would call bad bokeh, because the blur looks unnatural and is distracting.

Woodpecker On My Neighbor's Roof
1/320th of a sec | F/5.6 | 300mm | ISO 200

The reason this is bad is that the circles have what appears to be vertical lines on them. In this shot it’s unnerving! That can happen for a number of reasons, commonly from a scratch or the introduction of dirt on the front of the lens. I believe this shot might be the victim of a fingerprint or dog hair, because using the same setup I took the following shot three minutes later which has much less of the line issue – I most likely wiped off the UV filter I keep on that lens.

Carolina Wren On My Antenna
1/40th of a sec | F/5.6 | 300mm | ISO 200

To sum it up, the best way for you to start experimenting with artistically creating a shallow depth of field is to set your camera to aperture priority mode, dial in the smallest f-number you can (which means the largest aperture), zoom your lens to the longest focal length, and get pretty close to your subject. From there you can start to play with your settings to see how your camera and lens handles each setting – remember, different lenses will produce different bokeh, so try and familiarize yourself with which of your lenses make the best bokeh for your vision of the photo you are trying to create.


Insta Vs. Hipsta

Girlie Faces
Made with the Instagram App on the iPhone

Instagram is the latest in mobile phone photography apps that has grown quite popular. The idea is not that new, in fact I don’t really think it’s the best app for creating vintage style photos – I think Hipstamatic does the job fantastically. Instagram does have one thing that it does much better though, and that is the ability to take photos fast and share them quickly.

Day 283 - Stools @ Andolini's
Made on the Hipstamatic App on the iPhone

I know, I know… if it’s worth doing, it’s worth taking the time to do it right – But in the world of mobile phone photography, speed and convenience are king. Hipstamtic is a fun app to play around and experiment with, but if you want to catch the moment as it happens and not wait for unreasonable times between each shot, Instamatic will be the app you’ll want to fire up. I personally like to use the iPhone’s built-in camera app and then import the photos into my 3rd party apps – a feature that is unfortunately unavailable with Hipstamatic. I only use Hipstamatic if I have the proper time to set up and take the shot – with it’s selection of lenses and film types (which are available as packs that you have to purchase within the app), you can really make some beautiful photos.

I love these apps because mobile phone cameras are limited by their sensor sizes and resolution, and by exploiting that fact by stylizing the shots you make, you open up creative doors that you might ignore with a traditional camera. On the other hand, in the right situation with the right lighting, you can make some pretty damn amazing images with an iPhone. Over at fstoppers, Lee Morris has an excellent article demonstrating a fashion shoot captured using an iPhone 3Gs. Here’s the video of that shoot:

3M6Y6FAYE8CM


Extremes

Day 324 - Hotter Than Satan's Balls In July
1/1250th of a sec f/4.2 5 mm ISO 150

Some of my favorite shots comes from over saturating the photo in post. The effect of over saturation strips a lot of the variation in color & tonality that occurs naturally. It’s a great way to stylishly tackle the harsh light of mid-day, especially in a beach scene like the one above that I took with my waterproof Pentax point-and-shoot camera. At this point, we’re tip-toeing up to the line between photography and digital art, but that is for you to decide as to when it stops becoming photography and starts becoming something else. In my opinion, the elements of the photo are true as well as the composition. A good photograph still captures and defines a moment, and this definitely does that regardless of the treatment I apply to further expand what I envisioned this shot to look like when I made it.

I share this photo now because the sun came out today here in Charleston and the weather was beautifully mild. I felt a longing to be back in the middle of the summer heat while swimming in the Atlantic for hours on end. I took this shot over the past summer and I can’t wait to get back there again. I feel like we’re over that winter hump, and the light of day is going to start hanging around a bit more each day – these are simple things to look forward to, but it’s important to make a conscious effort to appreciate the gifts we are given each day.

Step into the light. So tired of being in the dark and all alone. Step into the light.

A friend of ours held a funeral this evening for her boy that passed away three months into her pregnancy. I can’t help but feel that life is so fragile, and if we don’t say thanks for what we have, we can never truly live nor strive for the most that life can offer. The tragedies in our lives act in contrast to our gifts. Without tragedy, we have nothing to gauge the fantastic things that surround us everywhere and get taken for granted. A man who loses his legs is suddenly aware of how amazing the act of walking is. A child with a loose tooth realizes how fantastic it is to be able to bite into a crisp apple again after the tooth falls out. And a parent that loses a pregnancy is able to love the children she has that much more, because the fact that they are here now is a miracle that gets easily forgotten by most of us during our daily grind.

We’ve started our year with high hopes and have had a very rocky road despite our optimism. I take each struggle as an opportunity to strengthen my resolve to accomplish the goals I have set.
It’s easy to compound the bad shit that happens and then make it worse by belittling the miracles that the negatives in our lives try to overshadow. Being happy isn’t easy when your in the dark, so I’m inviting you to step into the light, no matter how hard that seems.


Street Art On Film

ETTGS-DVD

Tonight I finally got a chance to catch the Banksy film “Exit Through The Gift Shop“. Not since the Wilco film “I Am Trying To Break Your Heart” have I enjoyed a documentary so thoroughly for starting as one interesting topic and then morphing into something completely different and just plain awesome.

Exit Through The Gift Shop seemingly starts out to be about Thierry Guetta, a Frenchman living in LA who runs a thrift shop, and his obsession with filming up-and-coming street artists such as Shepard Fairey and Invader to create his own documentary about them. At one point it is revealed that he’s got boxes and boxes stuffed with raw footage that he never planned to edit. This is where the movie starts to turn into something else – although not sharply. It took the eventual friendship of the famed British street artist Banksy for someone to really call out the Frenchman on his endless journey behind the camera. What happens after that is truly unbelievable. I don’t want to spoil it for those of you like me who have to wait for most movies to come out on Netflix (because the theater is the place I take my kids on the weekends these days) and may not have seen it yet. Go watch it on Netflix – or buy the DVD.

JMBRC-DVD

Another fairly recent documentary that I watched was “Jean-Michel Basquiat The Radiant Child“. This movie is not the comedic thrill ride of Exit Through The Gift Shop. This is more of a tragedy – the rise and fall of one of America’s greatest artists who got his start with street art by spray-painting on buildings with his tag “Samo” and quickly growing his desire to create into a multi-million dollar career. As you may know, this story doesn’t have a happy ending. Don’t worry, I didn’t just spoil the movie for you, the movie is not so much about his life as it is about being a fly on the wall as you watch film maker Tamra Davis’ footage of Basquiat in action. For those of you not familiar with Basquiat’s work, this movie does a great job of helping you get it. For him, it was not about color, texture, or composition. It was all about his vision and voice. His work seems downright child-like to most because he had little-to-no filter to hold him back. The guy was a master in defining just what art could be (not what it was) at the time and who knows if that was really his intention, but it certainly was his work’s effect.

Robert Donovan Check's His White Balance
1/250th of a sec f/2.8 11mm ISO 200

As photographers, we can learn so much from the other art forms. The same themes run though all of the creative processes, and some of the best and brightest stars of each generation are the ones that redefine what we once classified as art. How can photographers take a medium that for all intents and purposes was created to capture that which already exists and create something new? People are doing it every day. The secret is to take your vision of what you see around you and to capture it as you see it – not with your real eyes, but with your mind’s eyes. By drawing the onlooker’s eye to the points you want take them through in a photograph, you can paint the scene with your composition and exposure. By exploiting the shortcomings of cameras you can turn a realistic scene into one with motion, or extreme contrast, or strange colors. By knowing how to properly use the camera, you can make something rather ordinary look extraordinary. I could go on and on, but hopefully you can see why the camera is much more powerful than just a tool to take snapshots of family events. It is our brush, our piano, our pen and paper.

So to wrap this up, can anybody recommend a good film about Keith Haring? I remember going to see a show of his work when I was a kid and his work has really stuck with me since then.


Street Photography

Day 273 - Xylophone Man On Meeting & Market
0.4 sec f/2.8 11mm ISO 200

One of my favorite forms of photography to create is street photography. I remember showing the shot of the girl doing yoga that is featured at the top of this website (or by clicking here) to someone and they thought that it was weird that I was at the beach just taking shots of random people I didn’t know. I explained that that is the beauty of it – you are capturing real life, not posed life. Once people are aware you are photographing them out in public, they change. Sometimes that change ruins the shot.

I bring this up today because I was turned on yesterday by a post on Chase Jarvis’ blog to a very well known street photographer named Scott Schuman who runs the popular blog “The Sartorialist“. If you have a few minutes, watch the video that Chase shared (just under this paragraph) – it’s very inspirational – it will hopefully make you get why he does what he does.

It also reminded me of the legendary photographer Jay Maisel, who after retiring from doing commercial assignments in the 90’s, focused on street photography as well as teaching and selling fine art prints of his work. If you have a Kelby Training account, there is a fantastic series featuring Scott Kelby and Jay doing a photowalk through New York City. Guys like Jay Maisel and Scott Schuman both stress the importance of exorcising your creative mind, and they do it while approaching strangers so confidently that it’s tough not to be inspired by their skill.

King Street
1/60th of a sec f/5.6 200mm ISO 200

One of the things I’ve been known for here in Charleston, SC is my photographs of local scenes and events. I’ve been inspired to add a new “Street Photography” category to my blog to start sharing some of those posts in one organized place. It’s a way for me to have a place to talk about my life experiences when I choose to bring the camera along with me (which is most of the time). I’ve also added an “Insight” category, which is similar to the “Inspiration” category but focuses more on my soapbox type posts about technique, gear, or business, where the inspiration category is about things, people, or events that inspire me. Finally, I added a sub-menu at the top menu of the blog to quickly access these categories so you can browse the blog posts by whatever topic you’re in the mood to read about.

Have a great 1.11.11 – I’ll be more excited for 11.11.11 though 😉


Privacy Settings
We use cookies to enhance your experience while using our website. If you are using our Services via a browser you can restrict, block or remove cookies through your web browser settings. We also use content and scripts from third parties that may use tracking technologies. You can selectively provide your consent below to allow such third party embeds. For complete information about the cookies we use, data we collect and how we process them, please check our Privacy Policy
Youtube
Consent to display content from - Youtube
Vimeo
Consent to display content from - Vimeo
Google Maps
Consent to display content from - Google