Monthly Archives: November 2010

Do Something That Scares You

Billboard Guy

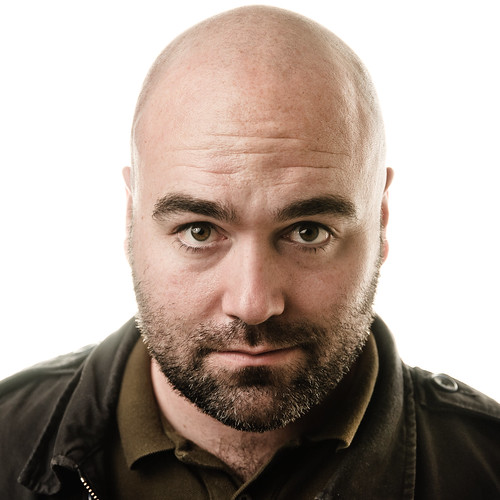
For the longest time I was scared to take photos of people (and I still am to a certain degree). I’m not alone when I say that when I started to really get into photography, I concentrated on scenery, still life, and designs. The more I shot landscapes and shapes and other non-human subjects, the more disconnected I became from shooting actual people! As I became more aware of my craft, I began to doubt my ability to create an artistic shot of a person because a tree never voiced its opinion of my art, but a person sure could. When I’m shooting a still life of a pomegranate, there’s no fear that it will be disappointed with the end product – I can only disappoint myself, which is much safer than upsetting a human.

Day 121 - Pomegranate

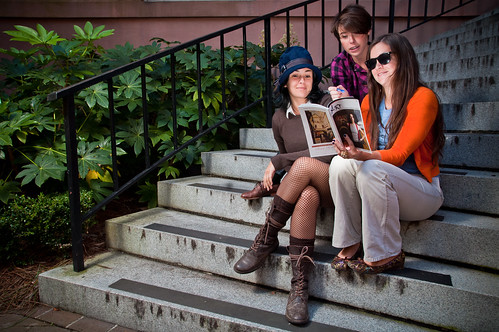
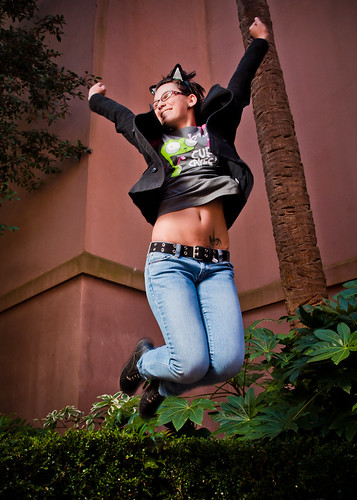
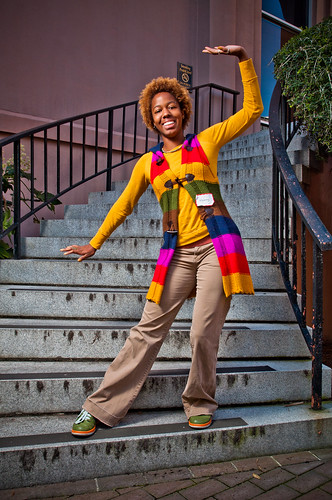
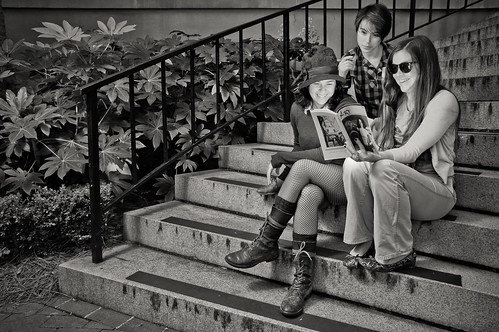
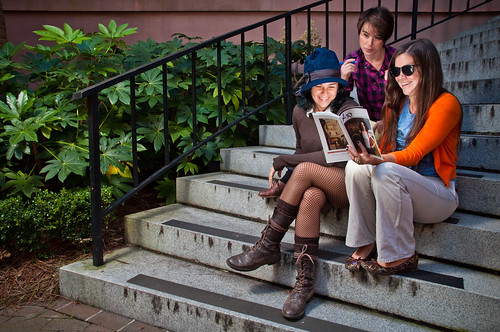
At some point I remembered that my favorite photographs before I really got into photography were of people. I needed to get back to what I first recognized as the appeal of this art. I started reading books by the likes of great people photographers Joe McNally and David duChemin, and scoured YouTube for videos of portrait sessions, and read up on lighting blogs. Eventually, I built up enough chutzpah to photograph a wedding! Since then, I’ve been seeking out opportunities to do portrait sessions. But not just ordinary pictures of people smiling. I’ve been looking for more artistic elements using what I learned from shooting all of those inanimate objects, and combining that with the unique energy of a person.

Dancing

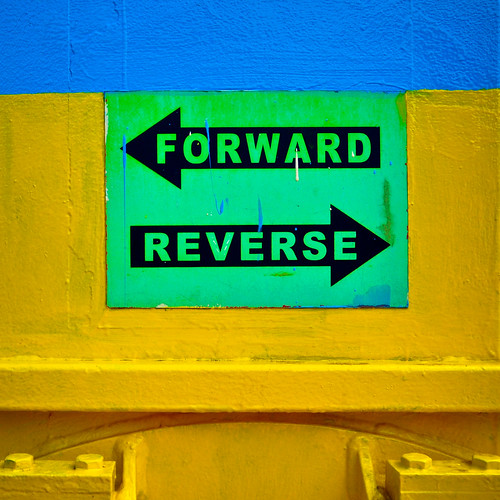
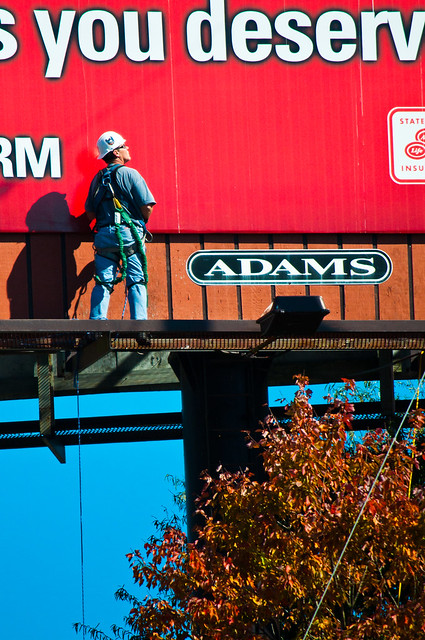
That photo of the worker on the sign up above really inspired me this morning. I was driving down the road when I saw that guy working on the billboard and two things came to mind; 1) The color and shape of the elements of the billboard against the sky really came together when a person was standing up on it, and 2) That guy’s job looks scary as hell. I’m not entirely sure what he was doing because he really hadn’t started working yet, but I imagine that it is not for the faint of heart. After I pulled into a parking lot next to the sign and pulled the camera up to my eye, the symbolism of the scene I was trying to capture hit me. You need to constantly challenge yourself if you want to move forward. You need to scare yourself. Not just in art, but in every aspect of life. I know it’s not a new idea, hell, “Do Something That Scares You” is probably trademarked by some motivational speaker somewhere (maybe it belongs to Jordan Chase), but to see something in everyday life that reminds you of it can be a moving experience.

With that said, my next big project, which is in the planning stage and could very well fall through before the deadline I have set for it, scares the piss out of me. It’s a huge undertaking and I may know by tomorrow if it will be happening or not. I will need a lot of help, but it will be well worth it to everyone involved. The best part is that I will include my awesome wife in this ongoing photography obsession of mine because it involves something she is equally obsessed with. I’m really hoping that the stars will align with this one, and if not, we do have a backup plan (but it would still be really cool if we can get this pulled off). Check back tomorrow night and I will hopefully be able to spill the beans!


BarCampCHS 2010 Photo Session

BarCampSessionPortraits12

Before I get into my recap about my photo editing session at BarCamp Charleston 2010, I wanted to share with you a quote from an interview I heard this morning while walking my dogs. The great Ron Bennington was talking with the legendary Quincy Jones, and Mr. Jones said something that just sent shivers down my spine. “I always wondered who was the designer of all of this stuff…. From races, to flora, to the whole universe. It’s astounding design” to which Ron responded, “It’s interesting how we all knew that when we were babies – everything was amazing, and then somehow we just forget about it”. To that Quincy Jones told Ron, “I never forget”. The man is the quintessential artist, and he summed up the reason why I ever wrote a song or made a picture. Life is amazing, and we should never forget the details of what, to quote Quincy Jones, make it so astounding.

barcampchsOK, so back to yesterday’s event. I got up at an ungodly hour to go to BarCamp, but when I found out how far some people traveled to be there (a bunch of people from the far reaches of SC, NC, Georgia, and even one guy from Italy), I quickly got over my grogginess. I wish I knew this beforehand, but after we checked in we had to pitch our session ideas to an auditorium filled with attendees. I had nothing prepared, which was particularly evident when the people doing a salsa session has music and brought out dancers for their 30 second pitch! After I stumbled though mine, we all had to anxiously wait for the schedule of sessions to be made. I got stuck with the last hour of sessions of the day, which was at 5:00PM. That was cool – it gave me plenty of time to get the shots I needed for the session I was presenting.

The Photo Session:

BarCampSessionPortraits09

The first person I tapped to be a model for me was a girl named Ebony, who was wearing an outfit that looked like she knew she was going to be in a photo shoot. She’s got the look of a model, but I don’t know if she actually knows that yet. When I met up with Ebony prior to the portrait session, she was talking to another girl who was wearing cat ears on her head and was appropriately named Cat. Bingo, another outgoing girl who was very photogenic! I enrolled her into my posse of tech conference models.

Cat

After I shot each of them individually, I asked them to pose for some shots together:

BarCampSessionPortraits11

The girls were awesome, and as you can see in the shot at the top of this post, they were very energetic and easy to direct. Once we started and the lights were flashing while I was barking out directions, a small crowd started to gather around us. I overheard someone asking another bystander if this was an outdoor conference session on photography – I guess in a way it really was. That’s the beauty of BarCamp – there is no rigid structure, it’s all done on the fly. Even a local reporter, Andy Paras from the Post & Courier tweeted the photo shoot!

After I was done shooting Ebony & Cat, I needed at least one more victim, er, I mean model. I saw two girls standing nearby and told them what I was doing the shoot for and asked them if they would like to participate. They seemed happy to help out. Now, I didn’t want to do the same thing I did with the other two girls, but I did want to use the same location. I asked them what they were at the conference for, and they told me they were attending for art. Awesome! I pried a little deeper and found out that they are behind Charleston Art Magazine, and they had a copy of it with them. OK, we have something to work with here. I had Stacy and Olivia sit on the stairs and read their magazine.

Charleston Art Mag Girls

It was looking great and then a third girl came over and wanted to join in as well. This created a problem, because for the way I wanted to position them in the shot, a shadow was being cast on the newcomer. I grabbed my other SB-600 flash and handed it to Stacy, one of the art mag girls, and told her to point it at the inside of the magazine as a flash bounce. Now we’re talking – all three girls had beautifully lit faces.

BarCampSessionPortraits13

I didn’t even have to give these models much direction after that because they were having a lot of fun with the whole thing.

Developing Photos In A Digital Darkroom Session:

During my session on editing photos in a digital darkroom, I picked 3 photos from the shoot to edit. The first one I did was of Cat jumping alone. Here’s the original shot of her unedited and shot in RAW (the following originals were all converted to JPEG for the web in iPhoto):

BCOriginals1

We talked about the basic theories in editing photos. Our goal with this photo was to show the high energy of Cat. We started out by minimizing the distractions and problems. The biggest problem with this shot is my umbrella in the top corner and the bright sky just underneath it peaking through the leaves. We decided the most effective way to eliminate this problem was to crop it out. We also wanted to slightly darken the white parts of the cat ears because they were reflecting the light a lot and drawing the eye away from her expression. We then added a graduated filter to the bottom left corner because the bright foliage was pushing the eye out of the frame. We added some vignetting to further pull you into the center – the lines of the palmetto tree and the building all add to the energy and direction of her jumping, but with the vignette we are able to stop the motion from immediately leaving the top of the frame. Here’s the final edit:

BarCamp Session Portraits Cat Final Edit

Next up was a photo of Ebony on the stairs. Here’s the original (click it to enlarge it):

BCOriginals2

Once again, we needed to minimize or remove any distracting elements. In the top left corner, the pole from my umbrella crept into the frame as well as a leg from the stand on the bottom left corner. Easy stuff to miss on the 3″ LCD screen of your camera. This time a crop wouldn’t be good because we agreed that the composition was just right and we didn’t want to change it at all. So, we discussed the options, and decided to use the spot removal tool in Lightroom to remove the unwanted objects. The top one was easy as the wall was a flat surface devoid of any patterns. The bottom was a bit more difficult because on the pattern of the stones. We eyeballed it to recreate the lines of the stones with a couple of spot removal areas, and it worked out really well. After that, I wanted to demonstrate how to use the adjustment brush to whiten her teeth. The problem was, she, nor Cat, were in need of it! We went through the motions and shared a laugh when I went the wrong way on the brightness slider and turned her teeth black. After that I wanted to show everybody how to diminish the bags under her eyes, but once again, she didn’t need it. Ahh, to be young again! Again, we went through the motions and dumped the file into Photoshop and used the clone stamp tool, set to lighten, to slightly diminish the extremely minimal darkness under her eyes. Back in Lightroom, we talked about the tone curve, and used it to adjust the contrast and then used the basic panel to brighten it up and pull the saturation ever so slightly. We also talked about the name badge she had plastered on her sweater, but for the sake of time I decided it would be a bit more elaborate to remove than the stuff in the corners and we just talked about the possible ways to use Photoshop 5’s new content-aware filter to remove it. I might try that on my own on another shot of her since I really haven’t given that tool a good test drive yet. Here’s the final shot:

BarCamp Session Portraits Ebony Final Edit

For our last photo, I wanted to talk about techniques for converting to black and white. I used a shot of the Art Magazine girls for this edit. Here is the original of this shot:

BCOriginals3

First off, we got rid of that sneaky light stand leg in the bottom left corner. We used the spot removal tool, which we decided was not really appropriate this time around, but would have to do since we only had a few minutes left in the session. I also adjusted the crop to remove the windowsill at the top of the frame after trying to darken it with the paint brush tool because I also wanted to get rid of the handrail on the right. Normally, I wouldn’t convert this image to black and white because I like the color of it, but it does have some great elements for a monotone image – great lines, the awesome texture of the foliage, and the light on the girls’ faces. So, we talked about the conversion process a bit. I showed them that we could simply remove all of the saturation and vibrance to make a black and white image, or we could just click on the black and white option of the basic panel in Lightroom to open up some fine tuning options in the B&W panel. We went through adjusting the different color sliders to see the effect they had on the image. Then we discussed a third option that turned out to be what we finally used for the conversion which was exporting the image to Nik Software’s Silver Efex Pro. We quickly ran through the presets and picked the “full spectrum” preset and made some minor tweaks to the contrast and structure sliders. Here is the final image:

BarCamp Session Portraits B&W Final Edit

And here’s the same image again in color, because frankly, I still like it better in color!

BarCamp Session Portraits Color

And with that the session ended, as did the “unconference” that is BarCamp in Charleston, SC. I was honored to be a participant in this years event and can’t wait until next year!


Happy Veterans Day

Day 68 - Remembering Veterans

I just wanted to quickly thank the people who defend the country I live in. The people who serve in our military do so to protect their families and loved ones, and to make it possible for us to pursue our own happiness. Whatever your belief is politically, when it comes to the men and women who protect our right to hold those beliefs, all sides stand united when we say thank you.


My Theory On Post Processing

I wanted to focus my philosophy on photo editing before I give my session on developing photos in a digital darkroom at BarCampCHS this weekend. To me it is an important element in photography that is often skipped by many. I don’t know if it is because people feel that it is too difficult or too time consuming, but since when is anything worth while easy? OK, here goes…

When I was a musician and my band recorded our first CD, we didn’t know anything about mastering. It was something that we cheaped-out on and the sound quality suffered because of our ignorance. We put all this effort into making a record, but didn’t put the right icing on the cake! Post processing is like sound mastering. You don’t need to change the product, you are just trying to enhance it – polish it up and make sure it looks the best that it can look.

This doesn’t mean you should ever shoot with the mindset that you can fix it in post. You should make the best digital negative you can in the camera. The ideal post processing situation is one that takes only minor tweaks to establish your final product. Proper exposure means a clean digital file, and good composition will yield you the highest possible resolution. These are skills that still need to be mastered, but the skill of post processing is just as important.

For my realistic editing techniques, I’m looking to make the photo pop, or stand out. The edits are subtle, and for most people they are not even noticeable, but they are very deliberate. I want to enhance a point of focus, or guide the viewer’s eye through the photo to drive home whatever point the photo is trying to make.

For more creative editing, when I’m trying to create a certain look, I start out by experimenting with different techniques while capturing the image that will allow me to successfully manipulate the file afterward to make my vision a reality. Sometimes there is a fine line between photography and digital imagery. It’s up to you how far you want to take the editing process. I sometimes will dabble in the unrealistic representation of a subject, but I would much rather leave the subject in tact and use the editing tools to further define a feeling or meaning though saturation, dodging, burning, contrast, etc. Most of the time that mood or feeling was there when I made the photo, but sometimes you want to smack the viewer over the head with it. That is completely OK, because there are no rules to this!

Lets take a look at a self portrait I made yesterday for my “No Shave November” personal project. I want to show you the original file first. I shot this in RAW (which is the file format you want to shoot in if you plan on editing your photos). RAW doesn’t show you all of the fancy in-camera optimizing magic that your camera is capable of doing when you shoot in JPEG. It’s the raw data that your camera sees. it’s a digital negative. So here’s the RAW file of my giant head from yesterday (converted to JPEG for the web in iPhoto):

Joe's Head

I chose this photo to show you because the shooting method I used to capture it was done deliberately to capture a specific look that I wanted to realize in Lightroom. I was standing a few feet in front of a wall, and there was a wireless Nikon SB-600 flash on a stand right behind me pointing at the wall. In front of me is another SB-600 shooting into a Photek Softlighter umbrella. I shot at f/4.5 at 250th of a second and ISO 200. There was a lot of light going on. I wanted to cut the ambient light and only capture the light from the flashes, so I shot at the fastest speed possible and adjusted accordingly. Admittedly, I could have adjusted it a bit more to get an even better exposure, but doing a self portrait is a pain in the ass, so I’m happy with what I got!

I brought the photo into Lightroom and made some heavy deliberate tweaks to achieve the look I was going for. The major changes are illustrated here in the basic panel of Lightroom’s develop module:

Basic

The other panel I wanted to show with you here is the Tone Curve panel. Notice the very strong “S” curve. This is a typical high-contrast curve. The beauty of a program like Lightroom is that you can visually tweak this curve to your taste. There is no mathematical formula to this, it is purely an exercise of taste.

Tone

Also, as part of my project, I limited myself by only using a square crop, so this is my final image after I cropped it and did some other minor tweaks such as lightening my eyes and diminishing the bags under them:

NSN-Day9

As you can see, the integrity of the image itself has not changed at all, but the quality of it is much better. Sure, if I shot in JPEG, the image would look better than the RAW version I showed you straight out of the camera, but the edited version not only looks better to me than anything my camera could do for this type of shot, it also looks exactly the way I envisioned it to.

On Saturday, I plan on shooting some photos in the morning at the conference, and then I’ll walk you through the editing process for three different techniques for developing them. It should be fun and I’m excited for it – I hope you are too!


Bringing Up Old Stuff

I just re-watched this video from last year and I really think it conveys an important message about perseverance. I sometimes get upset at Zack Arias because he comes off as a negative guy on his blog and on twitter. It can be a bummer to take input from a guy who doesn’t seem happy. But, when I watch this video, I realize that he knows he’s got issues, but works though them and has been coming out on top in spite of his apparent seasonal affective disorder. He’s a pro. It has little to do with his body of work that defines him as a professional, it’s his perseverance that makes him stand out (the awesome pictures don’t hurt though). His clients obviously love him and they should.

Some days, I get really frustrated at being an entrepreneur and I have to get out of my head and look at some of the other shitty jobs I’ve had in my life. When I was in school for my second go at it I was working during the day for an electrician. That in itself was not shitty, but the places we worked in were. Every day we were in a different nursing home, being reminded of our own mortality. I was in my early twenty’s and that was the time when the invincibility juice that every teenager is filled with begins to run dry. So, to make that chemical transition into adulthood while witnessing hordes of people in their final stretch of life is downright depressing. I moved on from there into much better environments, but even when I was working a job that many people would die for at MTV in Manhattan, I still had the fear of being outsourced and the constant reorganizations which made every quarter more stressful than the last. Working for someone else sucks, no matter how good the job is.

So, I salute you, Mr. Arias, for your perseverance and honesty. I thank you for reminding me that no matter how stressful my work can be, I’m in control of it and I ultimately set the tone for my own life. Every once in a while you need to look back to move forward.

Forward Reverse


What’s Going On At BarCamp CHS 2010?

BarCampCHS The name BarCamp is very misleading. At first glance it looks as though it might rival CupcakeCamp – thoughts of free exotic alcoholic drinks for everyone enter my mind, except if that were the case, a completely darker scenario would most likely unfold as inebriated attendees start invading each others personal space with stories of near-misses, high school sports accomplishments, and the good old days when computers ran on 5¼ inch floppy drives, eventually leading to at least 3 fist fights and countless inappropriate advances on the opposite sex. Don’t get me wrong, I would still go if that were the case, but I would most likely leave the family behind. Nope, this BarCamp thing is nothing like that – well except maybe for pining about 5¼ inch floppies.

I couldn’t attend last year’s BarCamp in Charleston, so I don’t have first-hand experience with it. The video above is from last year’s event, and it was made by my buddy Geoff. It should give you a good feel for what to expect. It’s a user-driven conference that covers a broad range of tech-related topics. To pull some quotes directly from their website, “BarCamp Charleston provides local area techies, developers, designers, and entrepreneurs with an open environment for learning and sharing.” and the addendum to that statement, “BarCamp Charleston is typically geared towards technology topics, but considering all of the creative diversity in the Lowcountry, we want to broaden the scope and encourage all digital artists, writers, designers, non-profits, and more to participate.”

Day 216 - Movie for One

The session that I have proposed is “Developing Photos in a Digital Darkroom” and I plan to talk about my theories about post processing and I will share how to develop three different styles of images using Adobe Lightroom. The theories and techniques can be applied using any kind of photo editing software, so there is no need to dismiss this if you use something like Aperture or Elements. I think it will be an exciting session as I see a lot of amazing photogs out there that are reluctant to finish the job they started by developing their digital negatives, usually rationalizing that you should get it right in the camera. Of course you should get it right in the camera, but that doesn’t mean you can’t make it exactly like you saw the image in your mind! We’ll dive into that topic on Saturday.

For $10, you get admission to the conference, which is at the College of Charleston this year, along with breakfast, coffee, soda/water, lunch, a t-shirt, other goodies, and entrance to the after party, which might turn into the scenario I imagined above. How could you not want to do this? You’re getting more than your money’s worth in food and clothing alone!

Lets talk about the diversity of some of the other sessions that are proposed at this time.

For those that like trading stocks, there’s “High Frequency Trading In Today’s Market“, which could go hand-in-hand with “Salsa dancing for noobs” and “Homebrew 201 – Taking your brew to the next level“. See, clearly there are options for your non-techie friends! While they’re learning how to drink, dance, and make more money, you can be “Creating a web presence with Joomla” or designing “HTML Email Newsletters & Double Rainbows” Wait a sec? Did somebody say double rainbow?

Another photography related session is “Photoshop: fun tips and tricks“. I think a popular session will be “The Social Graph – Who knows who?” which might prove to be an interesting networking opportunity. I’m also interested in “Good Vibrations: Take the Anxiety out of Goal Setting“, but mainly because the presenter’s name is Shoshanna Szuch, and I have the urge to yell out, “Au revoir, Shoshanna!” at random times on a daily basis.

I hope you can make it on Saturday, you should buy your tickets soon before they sell out!


CupcakeCamp Charleston

CupcakeCamp Charleston Diptych

Friday night I saw a blurb on Twitter about CupcakeCamp Charleston, and it immediately caught my eye. I didn’t know what it was about, what the point of it was, or who was even doing it – I just knew that my family had to be there. That is how powerful a name like CupcakeCamp is. For all I knew, this could have been the second coming of the Jonestown Massacre, but I was hypnotized by sugary goodness and had to check it out.

CupcakeCamp Charleston

We arrived to the Aloft Hotel in North Charleston to a lobby full of the happiest people on earth. Just look at that photo above, there ain’t a single unhappy person in the place. I didn’t know what was going on, but people were sitting around high on cupcakes, and there was a huge line snaked throughout the hotel of people waiting to try more. It was decadent to say the least. Just imagine a G-rated version of Studio 54, with sugar instead of cocaine.

CupcakeCamp Charleston Diptych

Did I mention that the cupcakes were all 100% free? I’m surprised that the place wasn’t rioting! Do you understand what I’m saying? Dozens upon dozens of exotic cupcake flavors – all you can eat – FREE!! I think we might have died and went to heaven, but instead of fluffy clouds, there was fluffy icing.

CupcakeCamp Charleston CupcakesCupcakeCamp Charleston CupcakesCupcakeCamp Charleston CupcakesCupcakeCamp Charleston Cupcakes

I think there was some sort of contest going on, but I couldn’t tell you who won. Who cares? I won – I got to eat carrot cake cupcakes followed by banana pudding ones. Contest??? Who the hell could choose? After 3 cupcakes, you’re stoned on sweetness. It was absolutely crazy. These people below looked like they were officiating something though:

CupcakeCamp Charleston Judges

I don’t even know what to make of this. I just hope it happens again… Soon. Like tomorrow. Please, God.


F**k Auto

Ricky Skaggs Live

So you went out and bought a fancy DSLR camera, or possibly one of those newfangled micro four-thirds cameras with interchangeable lenses because you’ve decided that you want to upgrade the photos you make by getting a better camera. You slap on the lens, pop in a memory card and then start taking pictures. Then the buyer’s remorse sets in because the photos don’t look all that much better than the ones on your little Kodak point-and-shoot! What happened? Well, like most people who own a camera, you left the camera in auto mode and expected it to interpret the photos you see in your mind into the photos that show up on your computer. Unfortunately, it doesn’t usually work out that way. Taking better photographs involves much more than an expensive camera. It involves a bit of knowledge, a dash of skill, and an eye for composition – none of which a camera can accomplish on its own. Let’s talk about making the switch away from auto mode.

Take a good look at the photo at the top of this post. That’s 14 time Grammy Award winner Ricky Skaggs and his band. There they are up on stage, acoustic instruments in their hands, singing their hearts out – these guys don’t know the meaning of “Auto”. I bet they all drive using manual transmission. You might not like bluegrass, but you can get the metaphor. I took this shot at the fair this past Tuesday. Here’s the camera info for this shot: I used my Tamron 17-50mm lens at 35mm, at 1/125 of a second with a f/4 aperture and ISO 800. I set this up manually on my camera during his first number and pretty much used the same settings for the rest of the shots I took of them.

Do you see all that negative space in the top and bottom right corners? Auto hate’s that. Auto is prejudiced against darkness. I hate prejudice, hence the harsh title of this post. If I took that shot and let Auto drive, the damn flash would have popped up so fast and punched this band right in the face with awful direct light that they probably would have stopped playing and kicked the camera out of my hands (well, not really, considering the amount of fans that were shooting pictures with their flashes on, illuminating only the back of the head of the person in front of them). Do you see all the color on the back of the stage? Auto wouldn’t. It would have blown that right off the photo. Auto is a dick. It only cares about the closest thing it can focus on. The rest of the scene is meaningless to Auto. Color? Dynamic range? Contrast? These are all enemies of Auto, yet they are some of the most important aspects of a good photo.

OK, so now you have a good reason to hate Auto, what are you going to do about it? You really need to learn about exposure and there are books on the subject, or you can google it and find a lot of really great articles on the subject, so go ahead – I’ll still be here when you’re done. Once you know what exposure is, you need to understand the basic relationship between the amount of light you let into the camera (aperture), the length of time you let that light in for (shutter speed), and the sensitivity of the sensor that captures it (ISO). It doesn’t have to be a geeky math nerd understanding, but at least an understanding of the aesthetic effect that those three factors have on your photography.

I know what you’re thinking – how am I supposed to capture a great moment and be expected to figure out what ISO setting to be on, what aperture to use, and what the proper shutter speed should be? By the time I flick one dial the moment has passed! Well, most cameras come with really good training wheels! There’s “Program Auto” mode (or P Mode), which lets you control the ISO, the flash, and the white balance, but it still chooses the aperture and shutter speed. P Mode still sucks, but it’s a start. I prefer “Aperture Priority” and “Shutter Priority” modes. They allow you to have control of the same things P Mode does, but you can either set the aperture if in A Mode and let the camera pick the best shutter speed based on the aperture you choose, or the shutter speed in S Mode which lets the camera pick the best aperture based on your shutter speed. You can also set the ISO, or program an auto ISO range when using one of these modes, so that you can limit the amount of possible digital noise in your photos. In a lot of situations, you can leave the white balance setting in auto WB as well, as it does a pretty good job of setting itself. In situations where you are using multiple light sources or there are extreme colors you want to enhance or diminish, then manually setting the white balance is a good idea. Some other settings you can manipulate in these modes are the type of metering and the exposure compensation. Both of these settings let you trick the camera’s built-in light meter into doing what you want – further giving you control of your vision. If you find yourself messing with the metering and exposure values a lot, you need to just shoot in manual and compensate with your shutter speed and/or aperture!

I realize that there is a lot to understand here and I’m just giving you a basic overview, but with time these things become second nature. I still spend a lot of time in aperture priority mode, because I like to control the depth of field in my work, and it usually serves me well in a pinch. Lately though, I’ve been making a conscious effort to hang out in manual mode and it has allowed me to do creative things much easier and more consistently than in A mode. When I recently did a series of portraits for a Halloween party, I set the camera manually to create consistent low-key exposures:

Brian

If I had used A mode, even if I were to adjust the exposure compensation, each shot would meter differently because of the color of their costumes and how the meter would read them. In manual mode, each photo will be exposed the same way. Another example is taking high-key photos like this one:

High Key Swings

In any other mode but manual, the camera would try to “fix” this shot because it’s deliberately over-exposed. Shooting in manual lets me further realize the images I want to create. This allows for artistic control – you are the one making the shot, not the camera. This is why when a photographer is told that they “must have a nice camera” when someone comments on one of their photos, they get pretty steamed! The camera would have screwed it up if it was in control!!

I don’t usually dabble into the how-to realm on this site, but I think it’s important that people understand how much work goes into making a photograph, and while I think it’s even more important to share the “why”, understanding the “how” lets the reader appreciate the “why” all the more. Now you know why I hate Auto and have a better understanding of how to stop using it, so go out and make some shots in M mode and further realize your artistic vision.


Charleston Magazine’s Last Page

String Theory

I mentioned in a post last month that I had some exciting news from Charleston Magazine, and today it came through. The photo above was selected for “The Last Page” in the November issue. The Last Page is a feature that showcases artwork from a local artist.

Charleston MagI’m especially excited to be involved in this month’s issue because it is Charleston Magazine’s first ever music issue. Music is a big part of my life, and if it weren’t for music, I wouldn’t have met my wife or enjoy the life I have today. It inspires me most out of all of the art forms, and it’s a big part of what drives me every day. To be included in this special issue as a photographer is a real wake-up call to my ambition as an artist.

Just last night, I was watching this video from the keynote of the 2010 PDN Photo Plus Expo by Chase Jarvis. He brought out a group of creative leaders connected to the world of photography and their stories of how they got to where they are in their careers made me realize that I’ve been somewhat blindly meandering down a path that sounds very similar to these very people that I admire. At some point, I’m going to have to make a choice to either grab the bull by the horns, or sit out on the sidelines.

It’s quite a difficult thing to even consider. I like my current career, but it leaves little room for a right-brained soul like me to breathe. I got into photography as a creative outlet. I walked away from my career in music because it was becoming a job and it was losing its ability to be that outlet (and the pay sucked). I don’t want that to happen with photography. I also don’t want to think that I could have done something that I consider meaningful and let it go because I was too chickenshit to pursue it. The most depressing thought in the world is of how many great ideas, paintings, songs, or photographs weren’t released to the world because somebody didn’t have the balls to see it through.

Over the next couple of days, I’m going to explore some of the themes that drive me artistically, so please check back soon to join me on this journey.


2010 Halloween Party Pics

2010 Halloween Party

I have posted a set of photos from our 3rd annual Halloween party up on my Flickr site. If you haven’t already checked out the guest portraits, make sure you do – the kids looked great this year! If any guests have any photos to share, please do so in the comments or on my Facebook page.

2010 Halloween PartySwinging Reagan

That’s all I’ve got for today. I’m on day 3 of my No-Shave-November “project”, and let me tell you, I love not having to shave in the morning. I wonder how hairy my face will be for BarCampCHS?


Privacy Settings
We use cookies to enhance your experience while using our website. If you are using our Services via a browser you can restrict, block or remove cookies through your web browser settings. We also use content and scripts from third parties that may use tracking technologies. You can selectively provide your consent below to allow such third party embeds. For complete information about the cookies we use, data we collect and how we process them, please check our Privacy Policy
Youtube
Consent to display content from - Youtube
Vimeo
Consent to display content from - Vimeo
Google Maps
Consent to display content from - Google